If you've spent any time wiring up tools for an AI agent, you know the pain: every model vendor has its own function-calling format, every integration is bespoke glue code, and every model upgrade breaks something downstream.
MCP changes this by providing a shared interface for tools, data sources, and AI clients. Instead of rebuilding integrations for every model or app, you expose capabilities once through an MCP server and let compatible clients connect to them.
Anthropic released the Model Context Protocol in November 2024, and by spring 2025, OpenAI, Microsoft, and Google had adopted it. It has quickly become the de facto standard for connecting AI systems to external tools and data. That makes MCP worth learning now.
This guide teaches you how to build an MCP server from scratch, expose it over two transports: **stdio **and streamable HTTP, connect it to Claude Desktop and Cursor. and provide you with a production checklist for hardening the production MCP servers before shipping them. The full code is available in the companion repo at the end
tl; dr
What is MCP
MCP Components in Nutshell
Build a Local MCP server (tools, resources, and prompts)
Connect to Hosted MCP Server (HTTP Streamable)
MCP Server Advance Use Case
Deployment Notes for Production MCP Servers
Conclusion
Frequently Asked Questions
Let's Begin
What is MCP
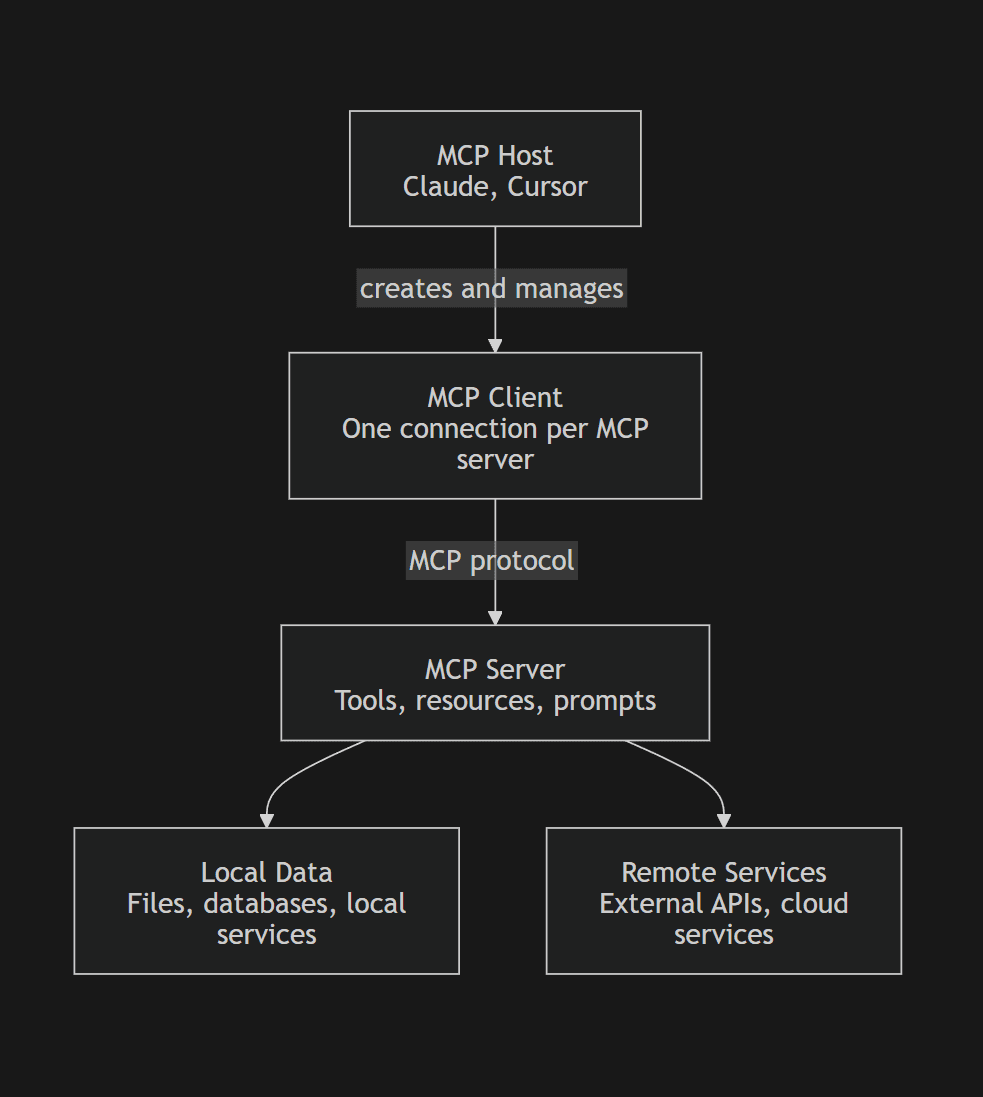
An MCP server is a JSON-RPC 2.0 process that exposes three primitives to any compliant MCP client over stdio or streamable HTTP. Those primitives are tools (functions the model can call), resources (data the model can read), and prompts (reusable templates). That's the whole protocol.
Everything else is an implementation detail as given in the comparison table.
**Feature** | **Model Context Protocol (MCP)** | **Traditional API (REST / GraphQL / gRPC)** |
**Primary purpose** | Give LLM-based agents a *single* way to fetch context **and** invoke side-effecting tools. | General machine-to-machine data exchange & business logic. |
**Integration effort** | Once an agent speaks MCP, it can talk to any compliant server; only one SDK/wire-spec to learn. | Each API exposes its own spec/SDK; you integrate them one by one. |
**Interaction model** | Stateful sessions + bidirectional messaging; supports long-running tasks and mid-job progress callbacks. | Stateless request/response; usually unidirectional. |
**Streaming support** | Standardised via “Streamable HTTP” (SSE/WebSocket). | Not part of the REST spec; developers bolt on WebSockets/SSE ad hoc. |
**Extensibility (adding new capabilities)** | The server can add new tools/resources without breaking clients; the agent discovers them at runtime. | Breaking changes need versioning, or clients must update to use new endpoints/types. |
**Standardisation/wire format** | One JSON-Schema-driven spec for inputs & outputs, plus defined transports. | Multiple styles (REST, GraphQL, gRPC) with differing auth headers, error shapes, and media types. |
**Maturity & tooling** | Rapidly growing, but still early; dozens of open-source servers and early commercial support. | Decades of best-practice guides, gateways, SDKs, APM, and monitoring. |
**Performance path length** | Extra hop (agent → MCP → underlying API) adds a bit of latency; streaming mitigates waiting for large payloads. | Direct call; generally lower overhead for high-QPS, deterministic workloads. |
**Typical sweet-spot use-cases** | Autonomous agents chaining multiple tools, dynamic workflows, and user-in-the-loop | CRUD data services, stable integrations, high-throughput micro-services. |
If you want a deeper conceptual primer, check out the [Model Context Protocol explainer](https://composio.dev/blog/what-is-model-context-protocol-mcp-explained/), which covers the architecture in detail. For primer, here is how this all works!
MCP Components in Nutshell
The Architecture
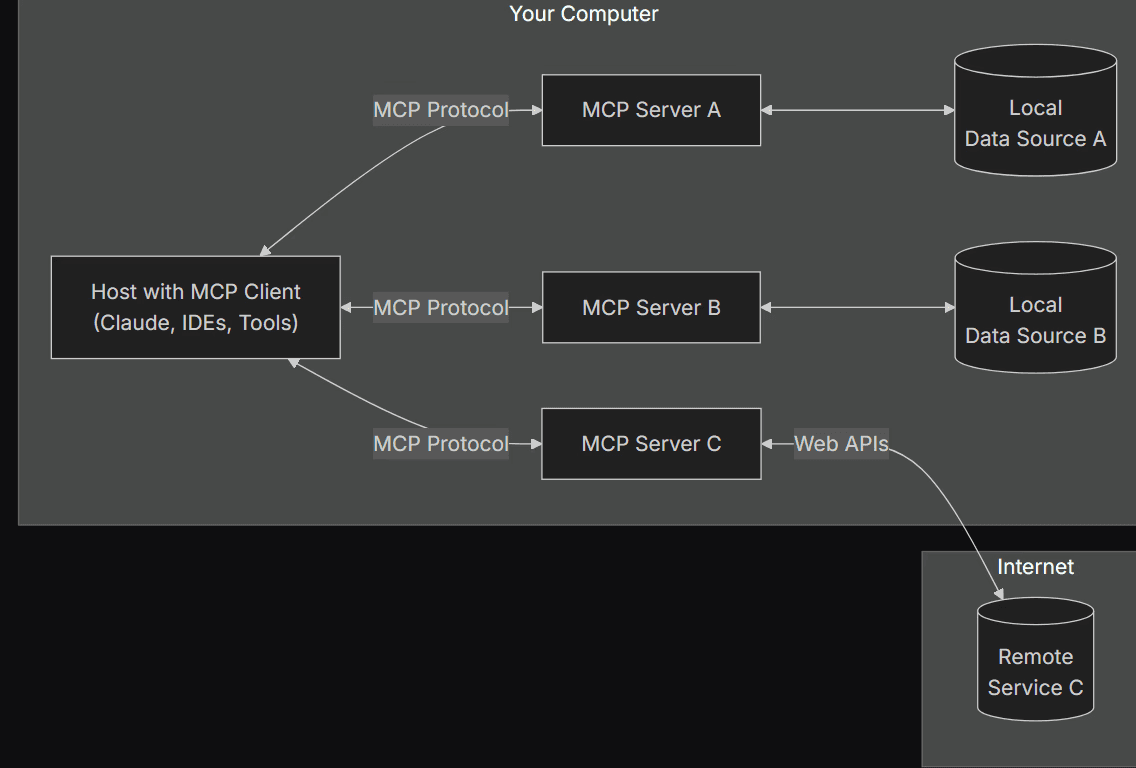
The MCP architecture consists of several key components that work together to enable seamless integration:
MCP Hosts: Applications that want to use tools or data through MCP. Examples include Claude Desktop, Cursor, or any AI app that supports MCP.
MCP Clients: Client instances created by the host. Each client maintains a dedicated one-to-one connection with a single MCP server.
MCP Servers: Lightweight programs that expose tools, resources, and prompts through the MCP protocol.
Local Data Sources: Files, databases, codebases, or local services that an MCP server can access on the user’s machine.
Remote Services: External APIs or cloud services that an MCP server can call, such as Google Sheets, GitHub, Slack, or Postgres hosted in the cloud.
At a high level, the host does not talk directly to your database, file system, or API. Instead, it talks to an MCP client, which talks to an MCP server, which then talks to the actual data source or service.
This simple diagram might help you understand the flow better:
The key point is that MCP servers serve as the integration layer. They hide the messy parts of authentication, API calls, file access, and business logic behind a clean protocol interface.
This separation of concerns makes MCP servers modular and maintainable. The AI app does not need to know how Google Sheets, GitHub, or a local database works. It only needs to know how to call the MCP server.
So how does this all connect?
How The Components Work Together
Let's understand this with a practical example:
Say you're using Claude Code (an MCP host) to manage your project's budget. You want to update a budget report in Google Sheets and send a summary of the changes to your team via Slack.
Claude Code (MCP host) initiates a request to the MCP client to update the budget report in Google Sheets and send a Slack notification.
The MCP client connects to two MCP servers: one for Google Sheets and one for Slack.
The Google Sheets MCP server calls the Google Sheets API (remote service) to update the budget report.
The Slack MCP server interacts with the Slack API (remote service) to send a notification.
MCP servers send responses back to the MCP client.
The MCP client forwards these responses to Cursor, which displays the result to the user.
This process happens seamlessly, allowing Cursor to integrate with multiple services through a standardized interface.
That's the working in a nutshell. From here on, we will focus on building.
Build Local MCP Servers
We'll build something you'd actually deploy: a GitHub issue search server that lets your AI assistant search issues, fetch issue details, and pull recent pull requests from any repository. [subject to change]
We will follow a series of steps to make sure things go smoothly. This is also industry standard, so it's best to follow along.
Prequires
Before anything else, ensure you complete the prerequisites, as they will be the foundation for any MCP implementation we do.
You'll need:
Python 3.10+
Node.js 18+ for TypeScript (if you choose to build with TypeScript)
Claude Desktop or Cursor for testing
A common question users often ask: when should you pick Python vs. TypeScript? Here is an honest review:
Python with FastMCP is faster for prototyping and works well for stdio servers.
TypeScript shines for HTTP servers deployed to Cloudflare Workers, Vercel Edge, or any Node-based stack due to its type safety.
In case you are wondering, Composio is the ultimate integration platform, empowering developers to seamlessly connect AI agents with external tools, servers, and APIs with just a single line of code.
With the fully managed MCP Servers, developers can rapidly build powerful AI applications without the hassle of managing complex integrations.
In a nutshell: Composio handles the infrastructure so developers can focus on innovation.
Next, let's set up the working environment.
Work Environment Setup
We start by creating a project directory.
Navigate to your working folder and create a folder named MCP, or u can use the terminal command:
Next, create a virtual environment using:
Now activate the environment with:
Ensure you see (.venv) in Front of the terminal cwd path.
Finally, install the FastMCP package
Writing Server Code
Server code is where the entire MCP server logic lives. Create a new server.py file and inside it paste the code below:
Key points from the code:
mcp: It's the Fast MCP object named as provided. Important to initialize at the start.@mcp.tool(): Decorator wraps the entire function underneath and exposes it as a tool to the MCP client. Docstrings are very important; a good docstring leads to fewer model failures. Includesgenerate_password,list_files,read_filetools.@mcp.resource("data://sys-info"): Decorator wraps the entire function and exposes it as a resource file that the client can use to fetch data. The path to the created resource is defined in(). Includesget_system_inforesource@mcp.prompt(): Decorator wraps the entire function and exposes it to the client as a prompt builder, useful when the task requires a specific use-case prompt. Docstrings are important here. Includeshelper_prompt,api_endpoint_design_promptmcp.run(): Runs the MCP server. For a streamable HTTP MCP server, usemcp.run(transport="streamable-http", host="0.0.0.0", port=8000)
Overall, we are wrapping different functions and exposing them to the client as the MCP tool, resources, and server.
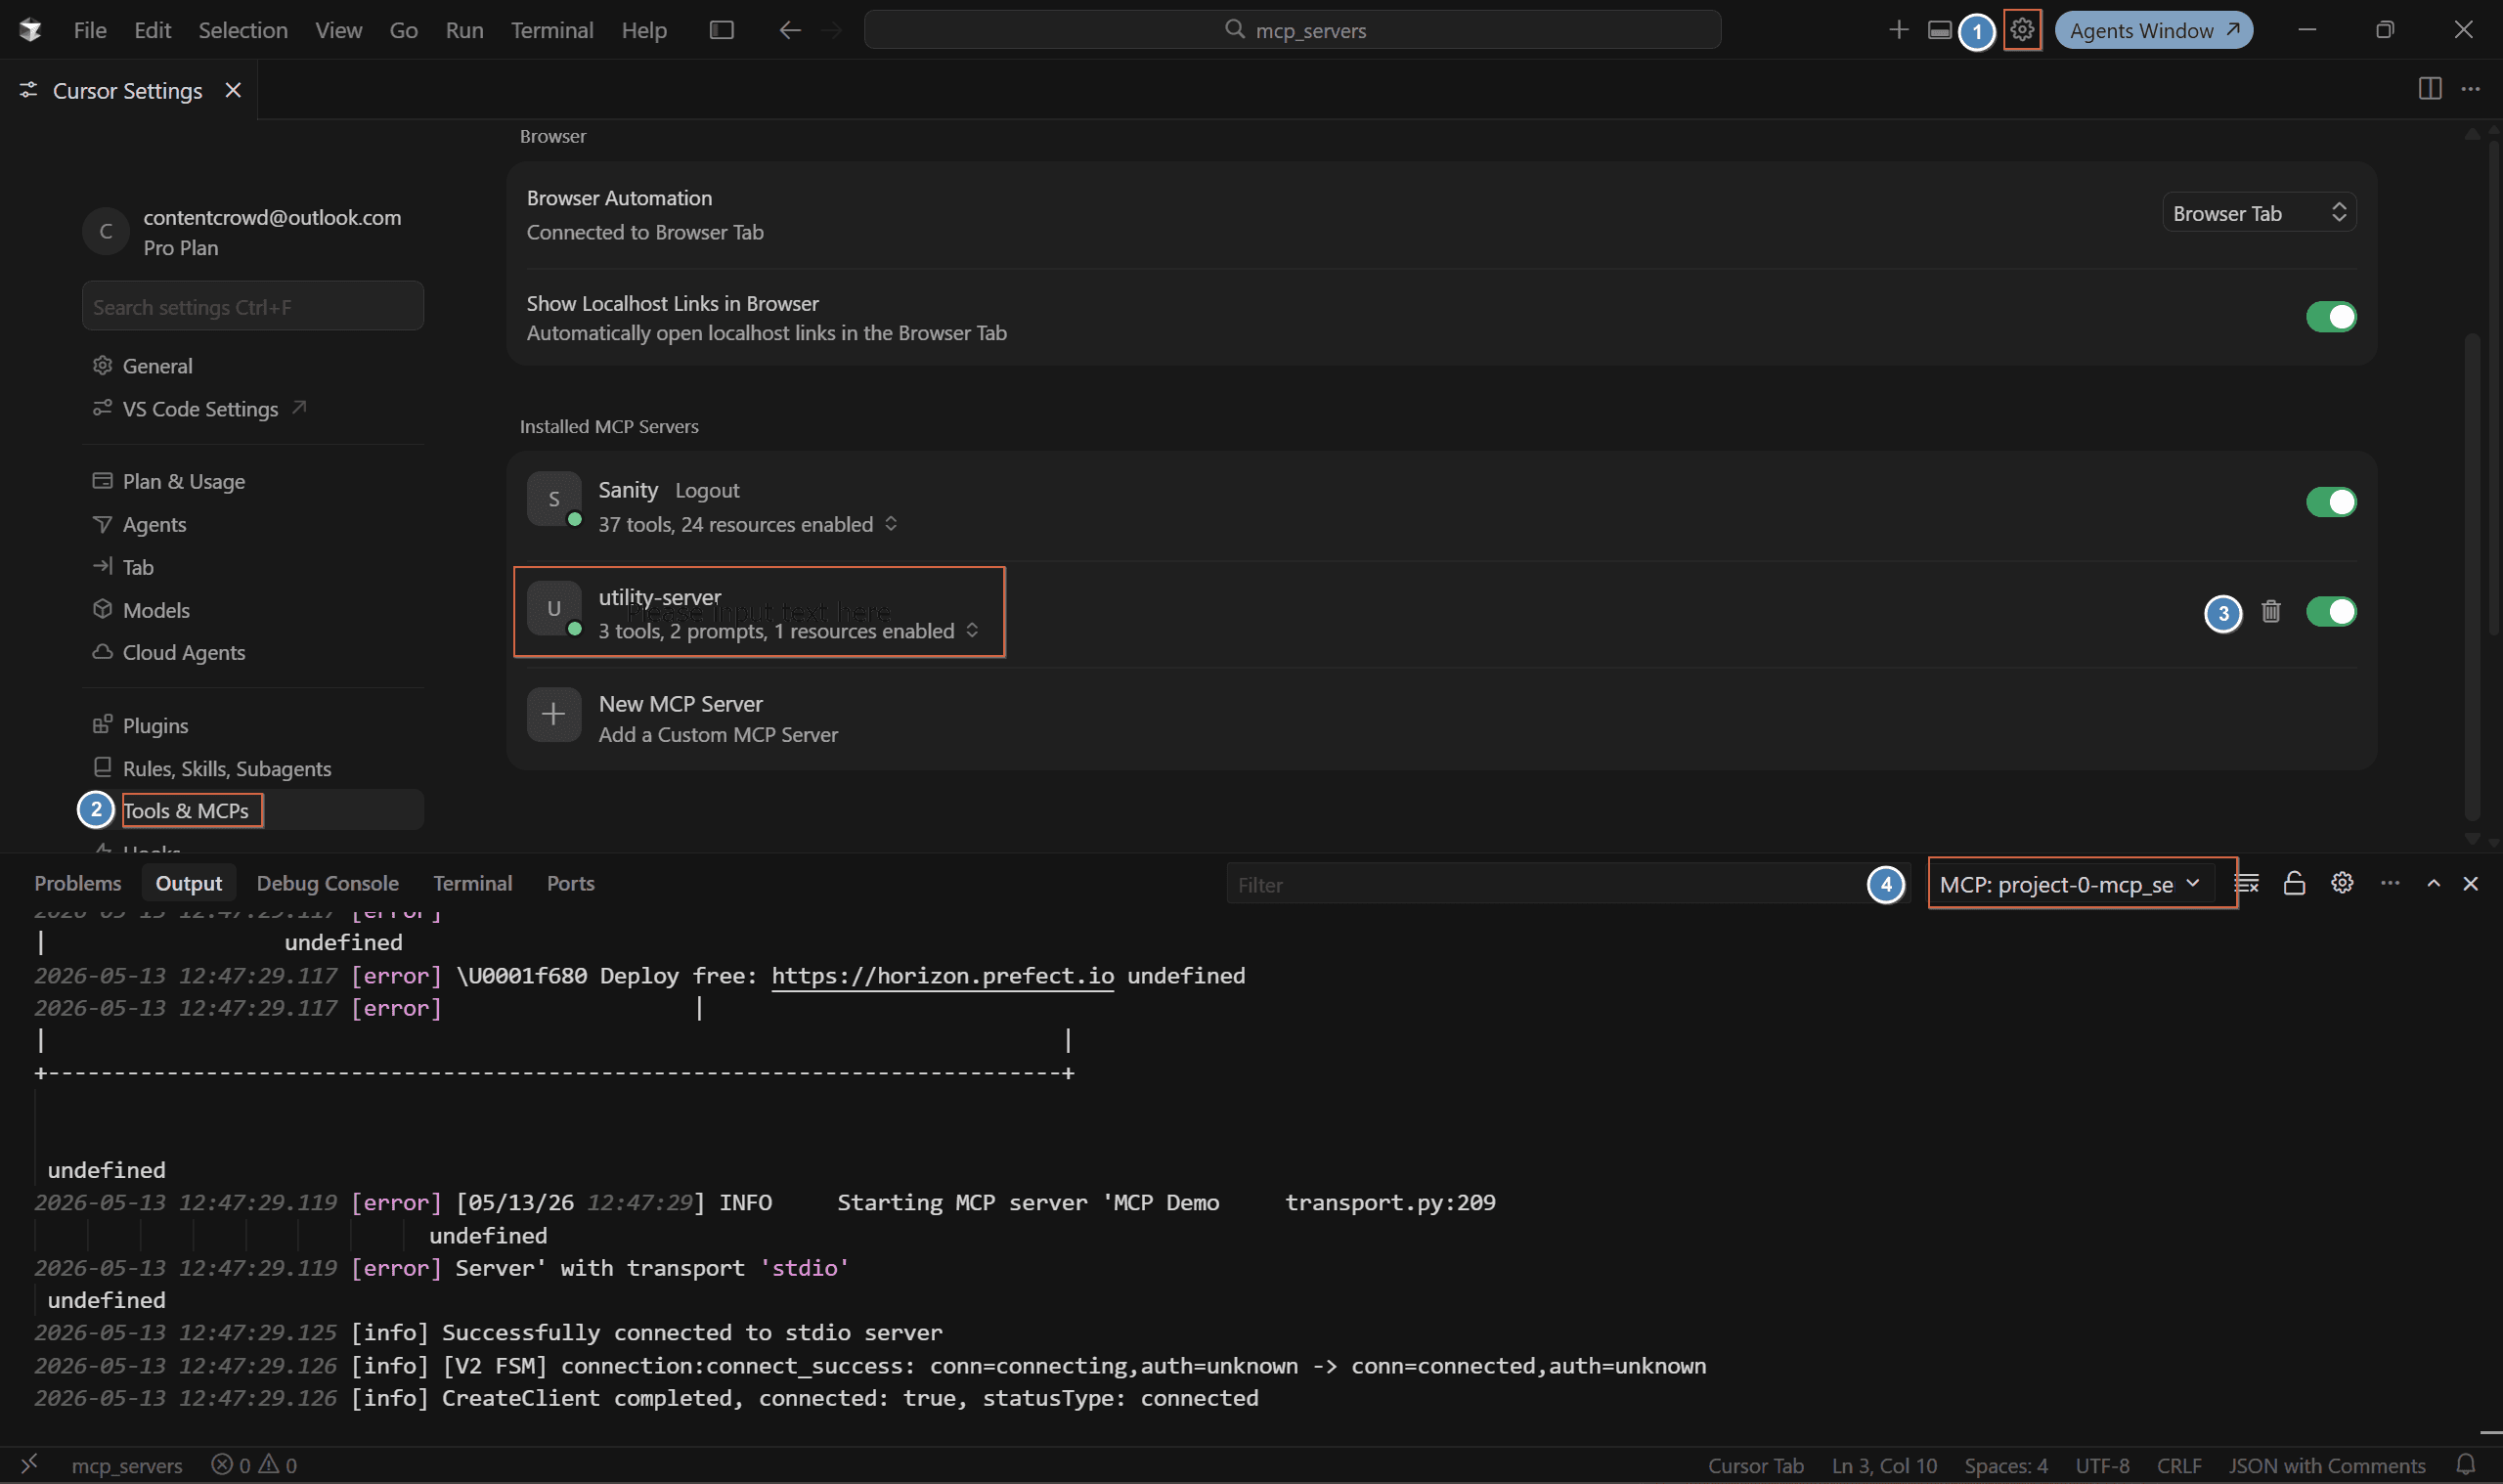
However, to use it with the client, additional config is required, so let's set that up. I am using a cursor for the demo.
Head to the Cursor and create a new folder .cursor , inside it creates a new file mcp.json (the config file) and paste the following setup.
Quick Tip: To verify this works is by pasting the command and args together; if they start the server, you are good to go; else, provide the full path. I usually go for path of .venv’s
python.exe
Open Cursor Settings, then click Tools & MCPs. You will see your local MCP name. Click Enable,
To check, open the terminal, switch to the Output tab, select the MCP server, and check for the connected message.
Now we can test our MCP Server by opening the chat/agents window and invoking any of the defined tools via the prompt. I invoked the password-generator, as I often find myself asking Claude to "think of a 16-character password" (which is terrible).
Here is the output:
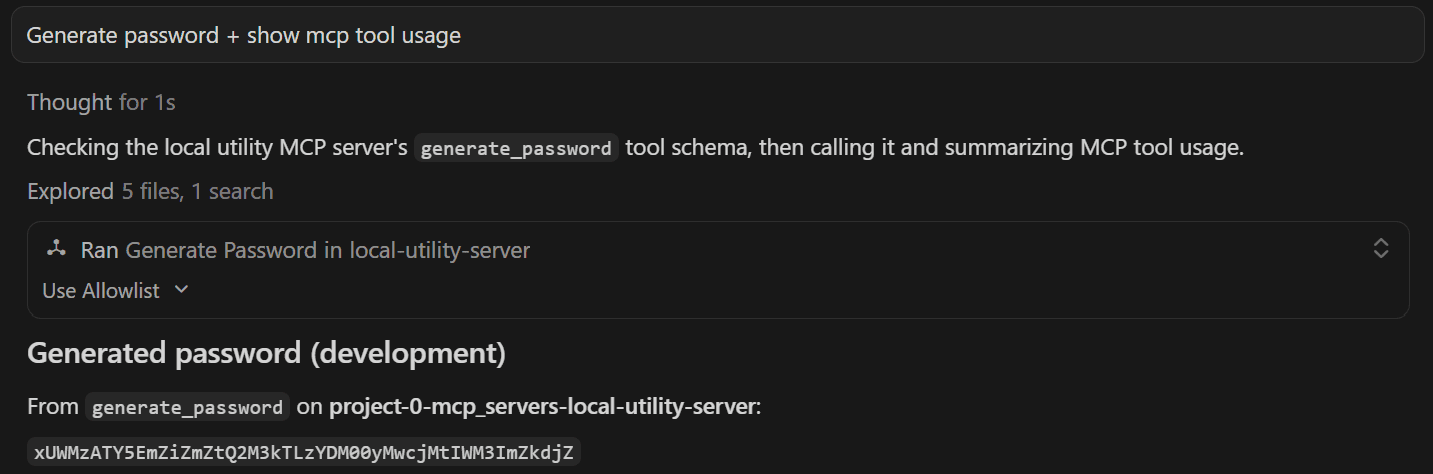
Saw that Ran command, it means the MCP server asked me for permission. I kept it that way, as you never want to let an agent touch your system files.
Note: If docstring is poor, the mcp client might fall back to cli approach, the easiest way to fix this is add a rule to only use mcp servers for the task. You will find a similar approach in the project github repo as well.
All this is great, but setting it up for testing a local MCP server is a hassle. Let's look at an easier approach, MCP Inspector.
Test with MCP Inspector
To test the MCP server's functionality, we will use the Fast MCP Inspector, a browser-based tool that connects to the server and lets us call tools directly, without an LLM layer.
Run MCP Inspector, with:
You'll see a localhost URL. Open it in your browser, click Connect, and you should see your server respond.
Now you can run and test your tools, resources, prompts, and more right from the browser, quite handy for developers testing MCP servers' performance and understanding response schemas. Check out the MCP Inspector Guide to learn more.
Personally, I find it best for testing prompts’ responses. Here is the response it generated:

Local servers are great for simple use cases, but for most industry use cases, they don't provide the required infrastructure. Let's explore better use cases.
Connect to Hosted MCP Server (HTTP Streamable)
Having a local server is good, but not as great as the one used in production. Usually, these are hosted, secured by design, and optimized for multiple tool calls.
Usually, these are servers written by expert developers, integrated with the app's internal mechanisms, and intended to serve as connectors.
But here lies the issue: connecting to 30+ MCP servers for a single project is a pain. Composio solves this.
Let's look at how you can connect to the hosted Composio MCP server. You connect it once and use 1K+ tools directly, all secure, optimized tool calls.
Connect to Composio MCP Servers (Streamable HTTP )
Integrating with Composio MCP is incredibly simple and takes just 5 steps.
Visit the Composio MCP page. Ensure you are logged in, or else sign up
In the dashboard, head to the Install Section

Select your MCP client and follow the instruction manual.
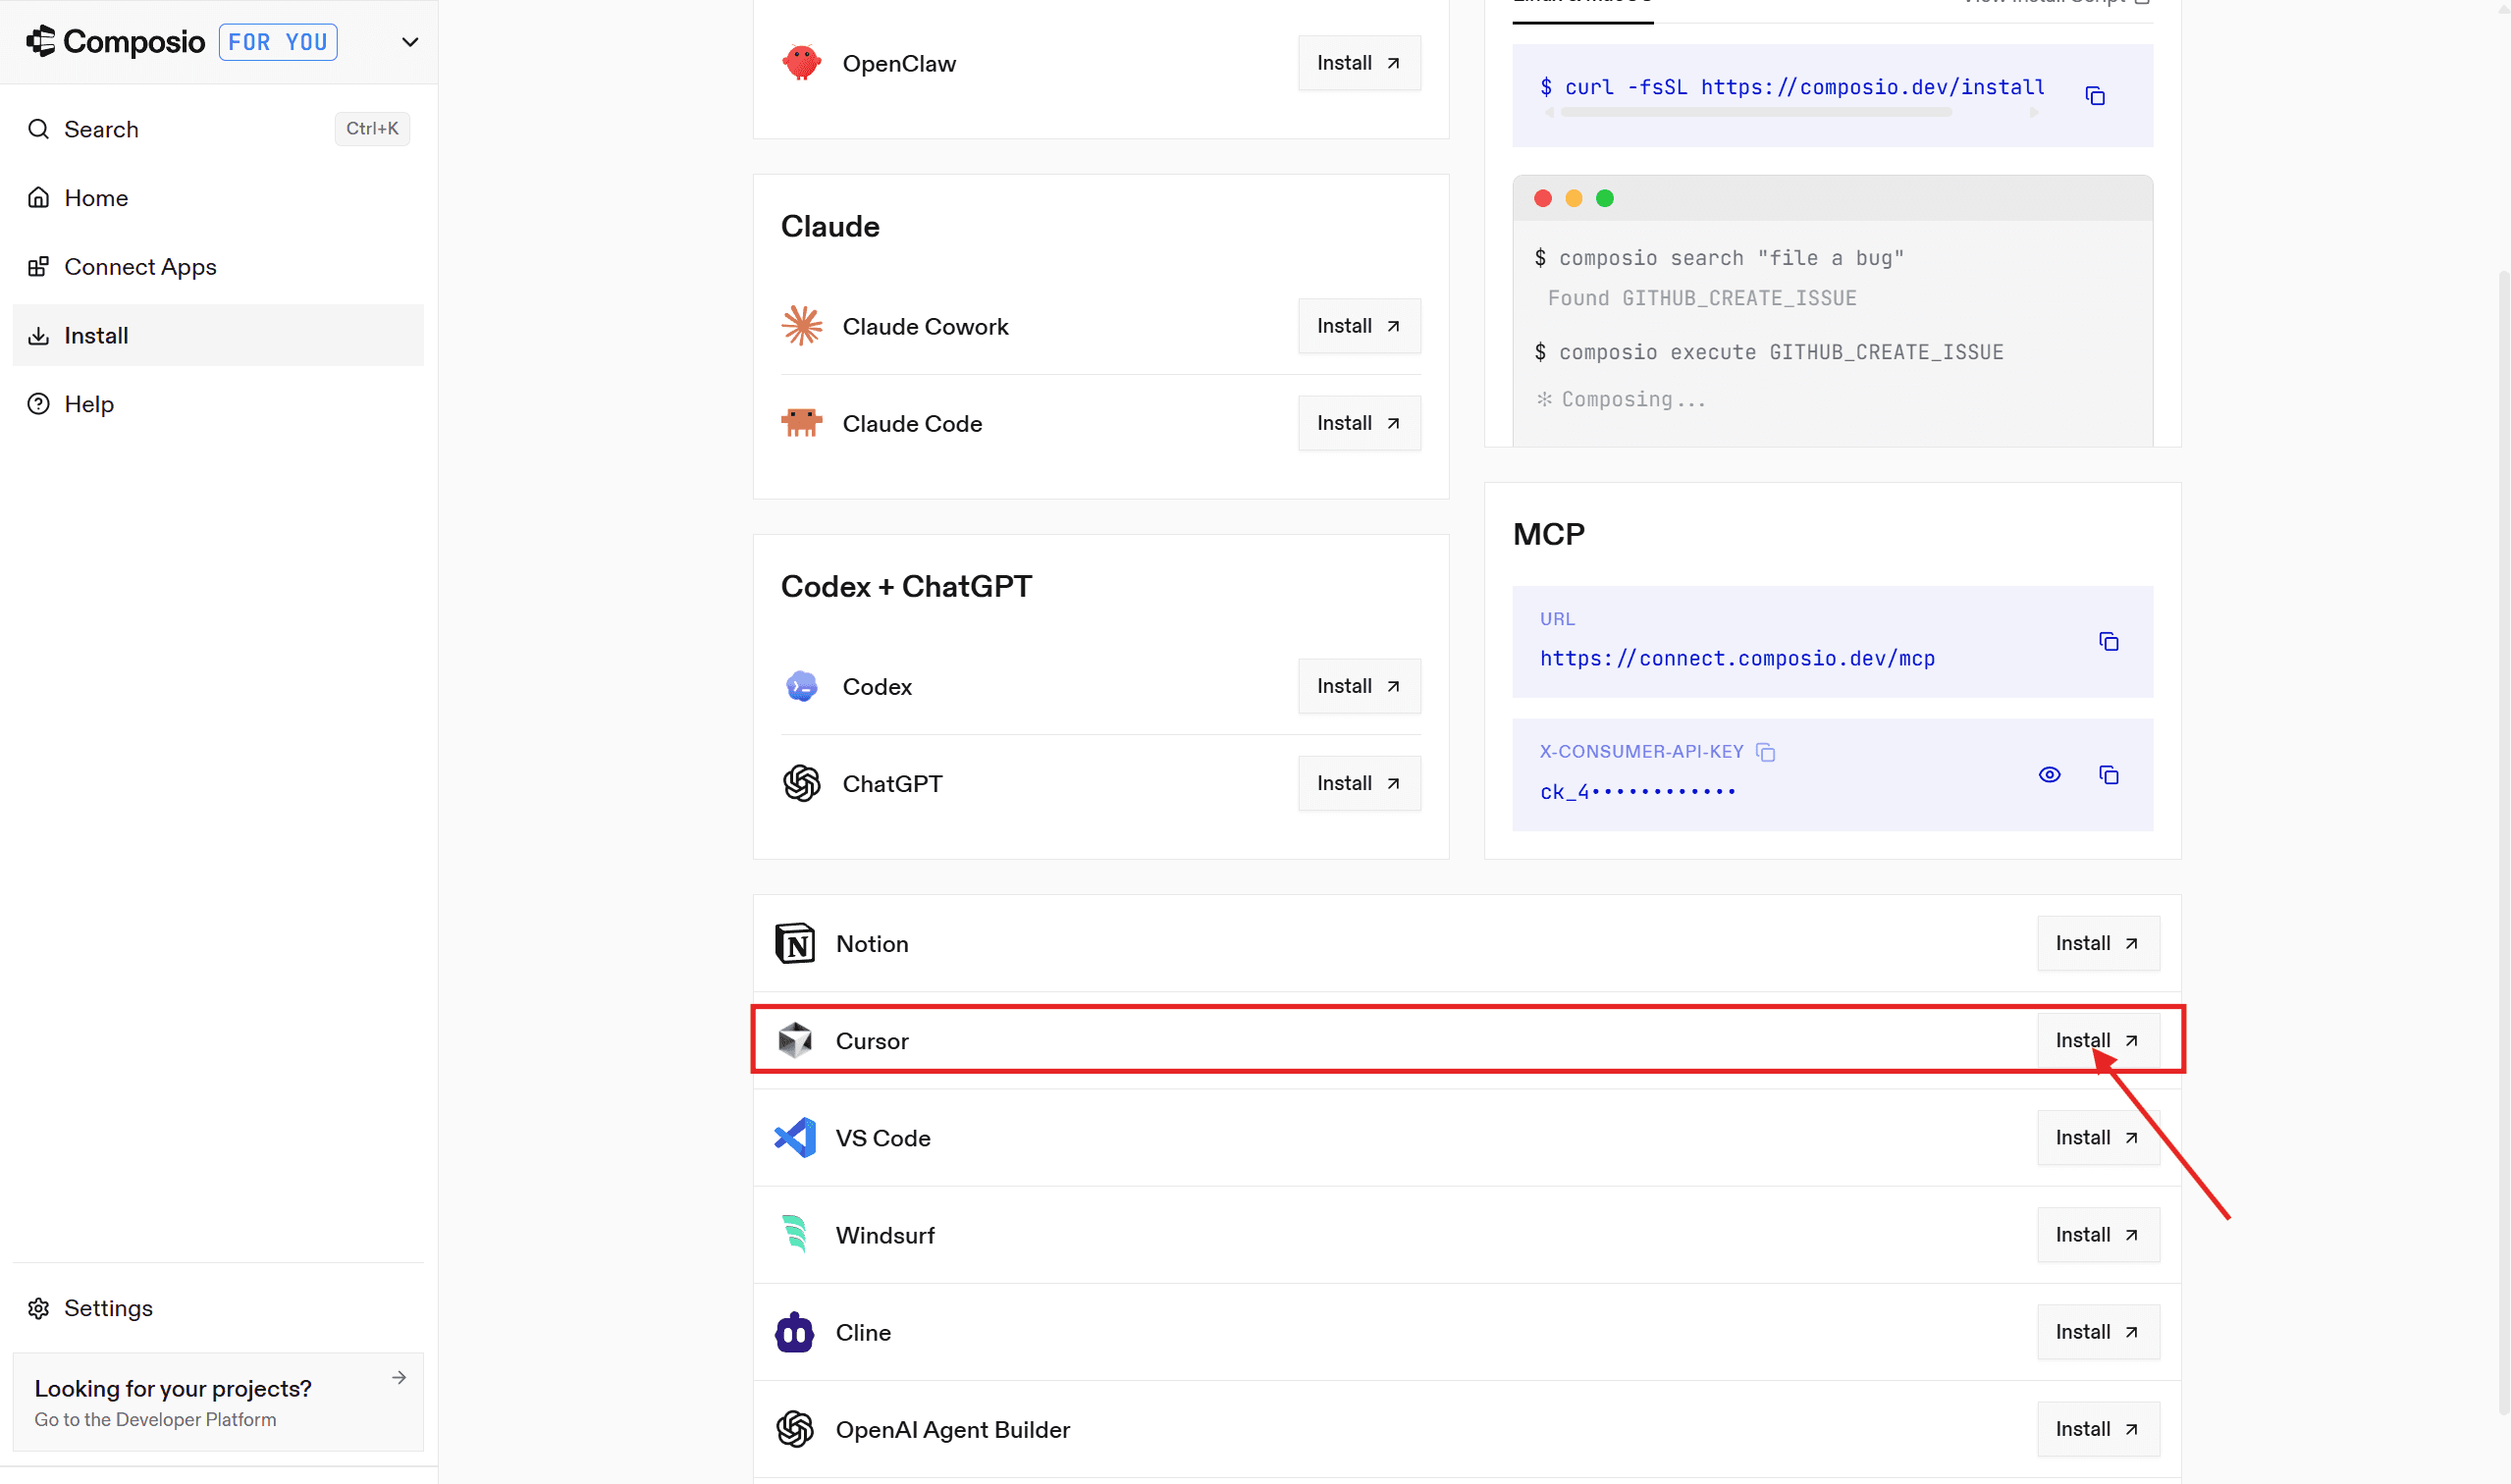
In the redirected page, click on “Install in Cursor.”

You will be redirected to Cursor, and in the MCP server Page, click Install
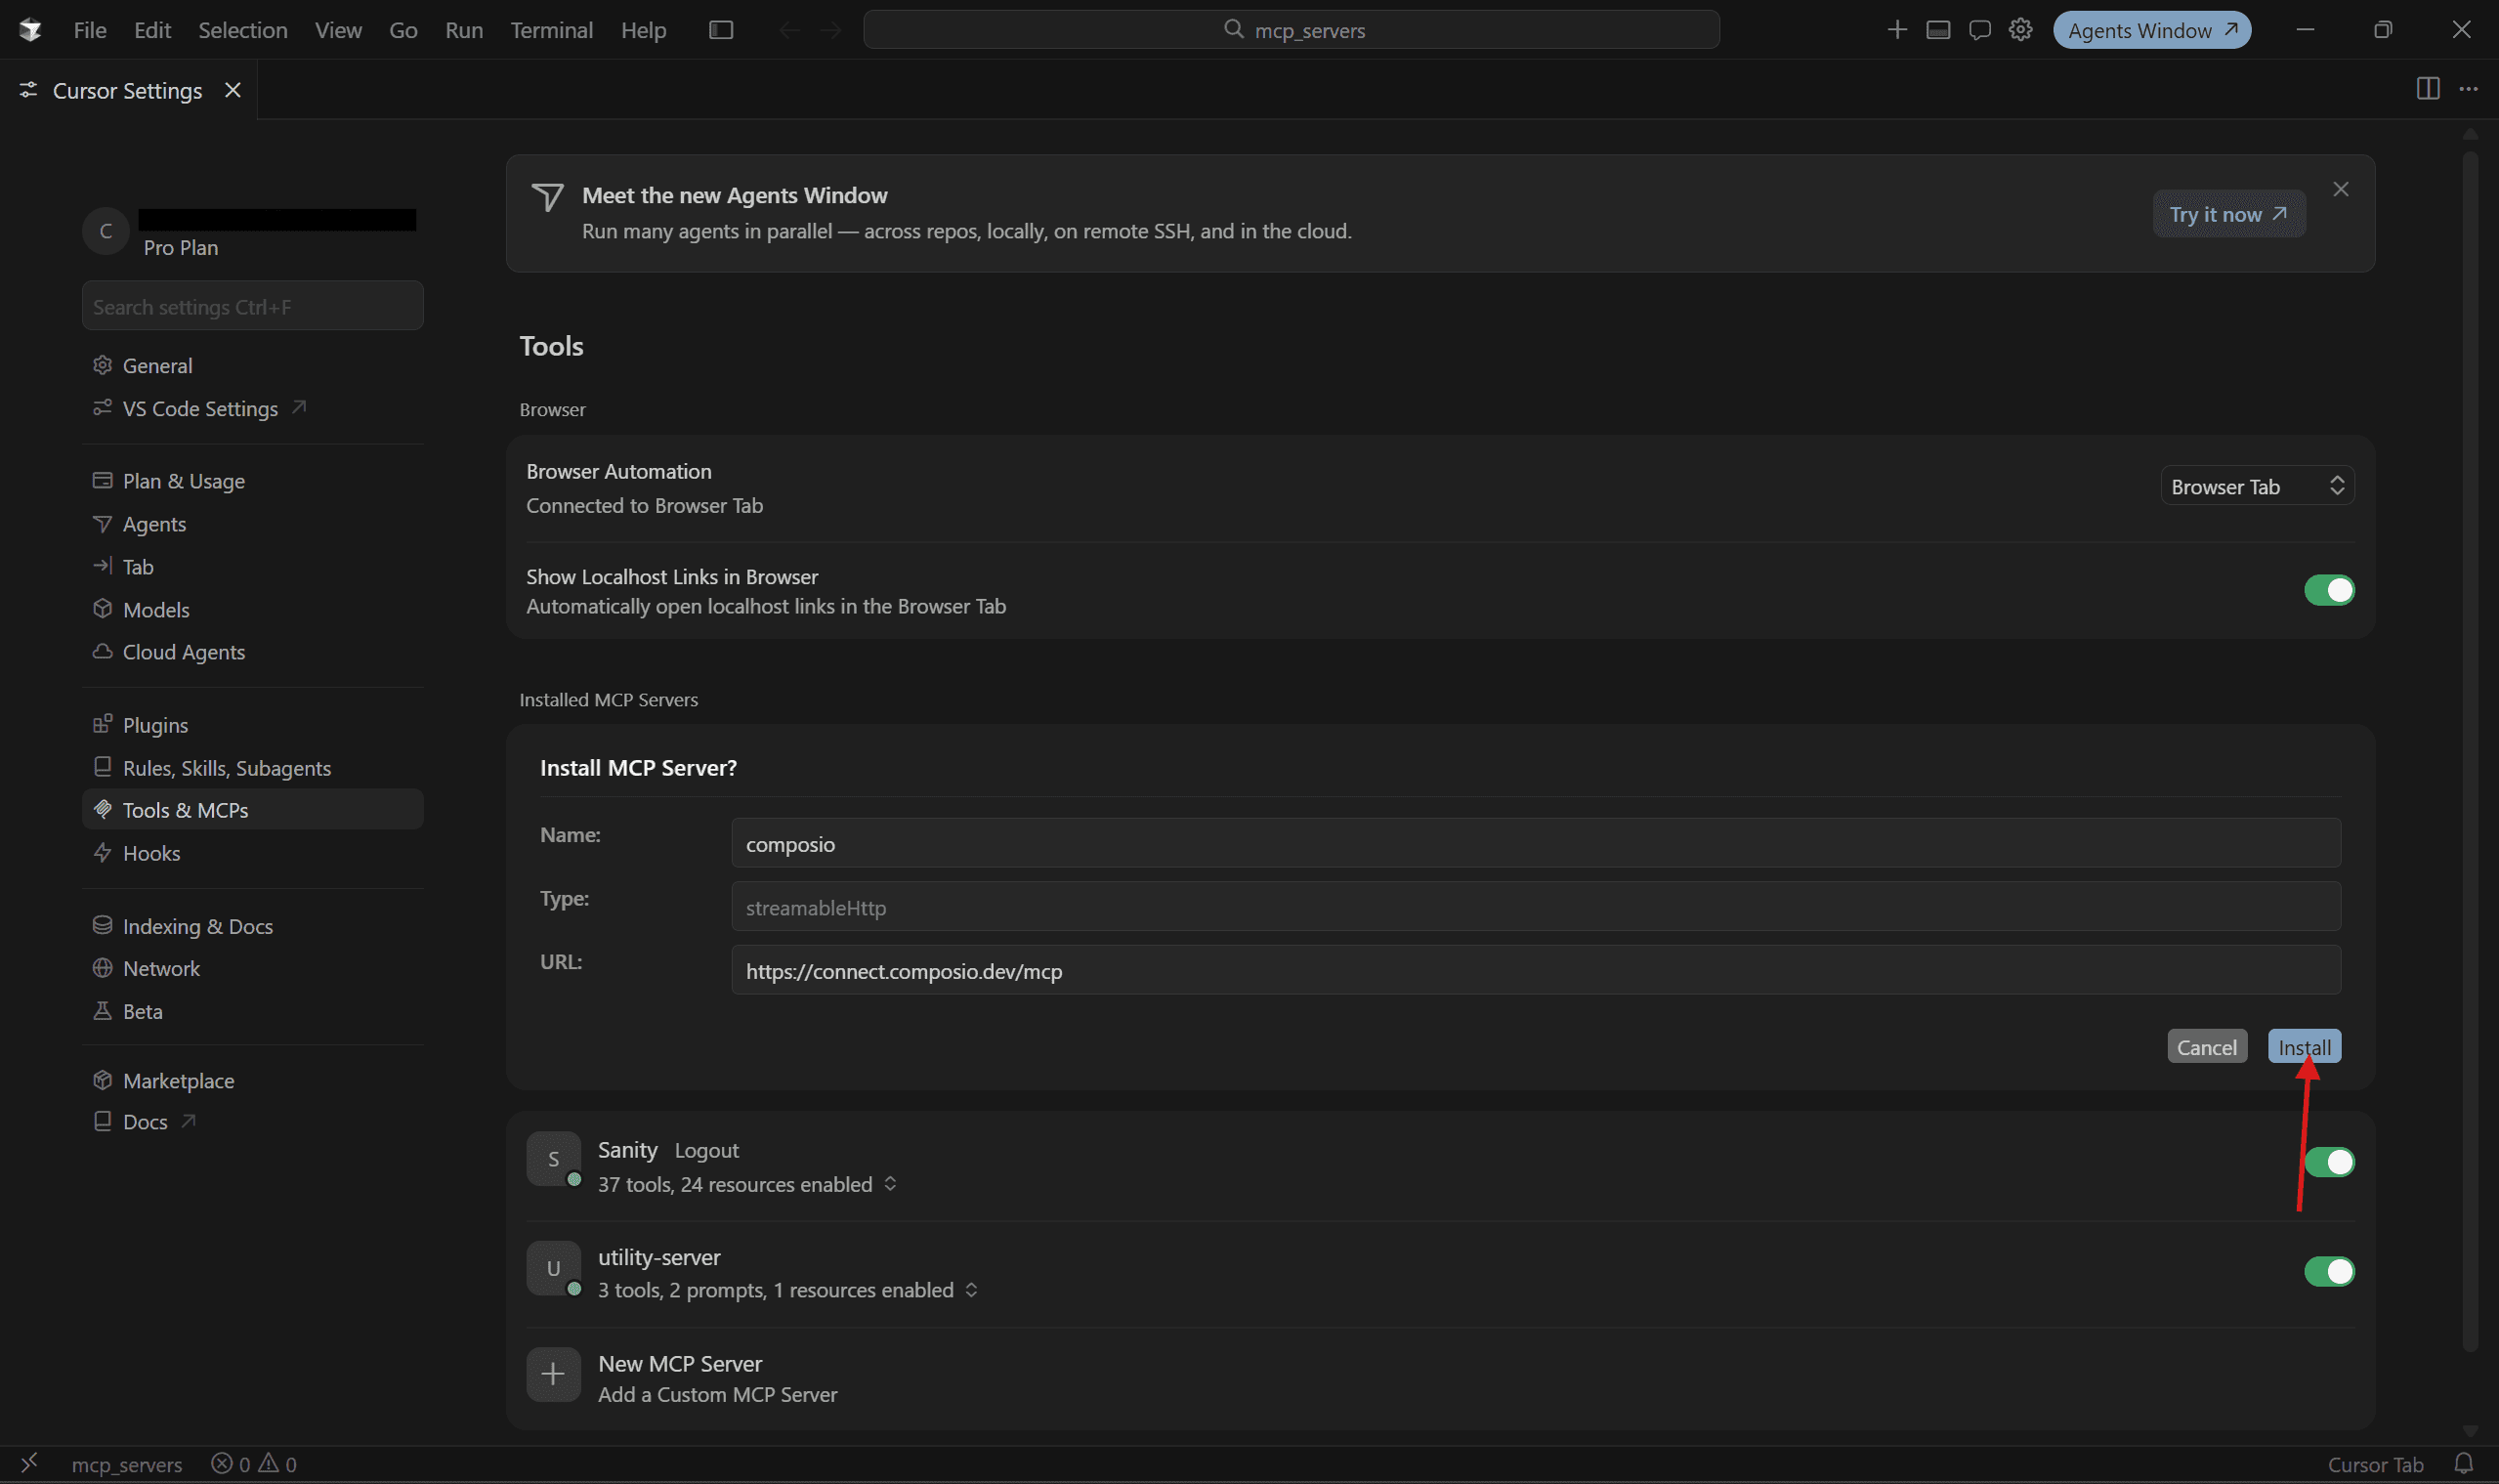
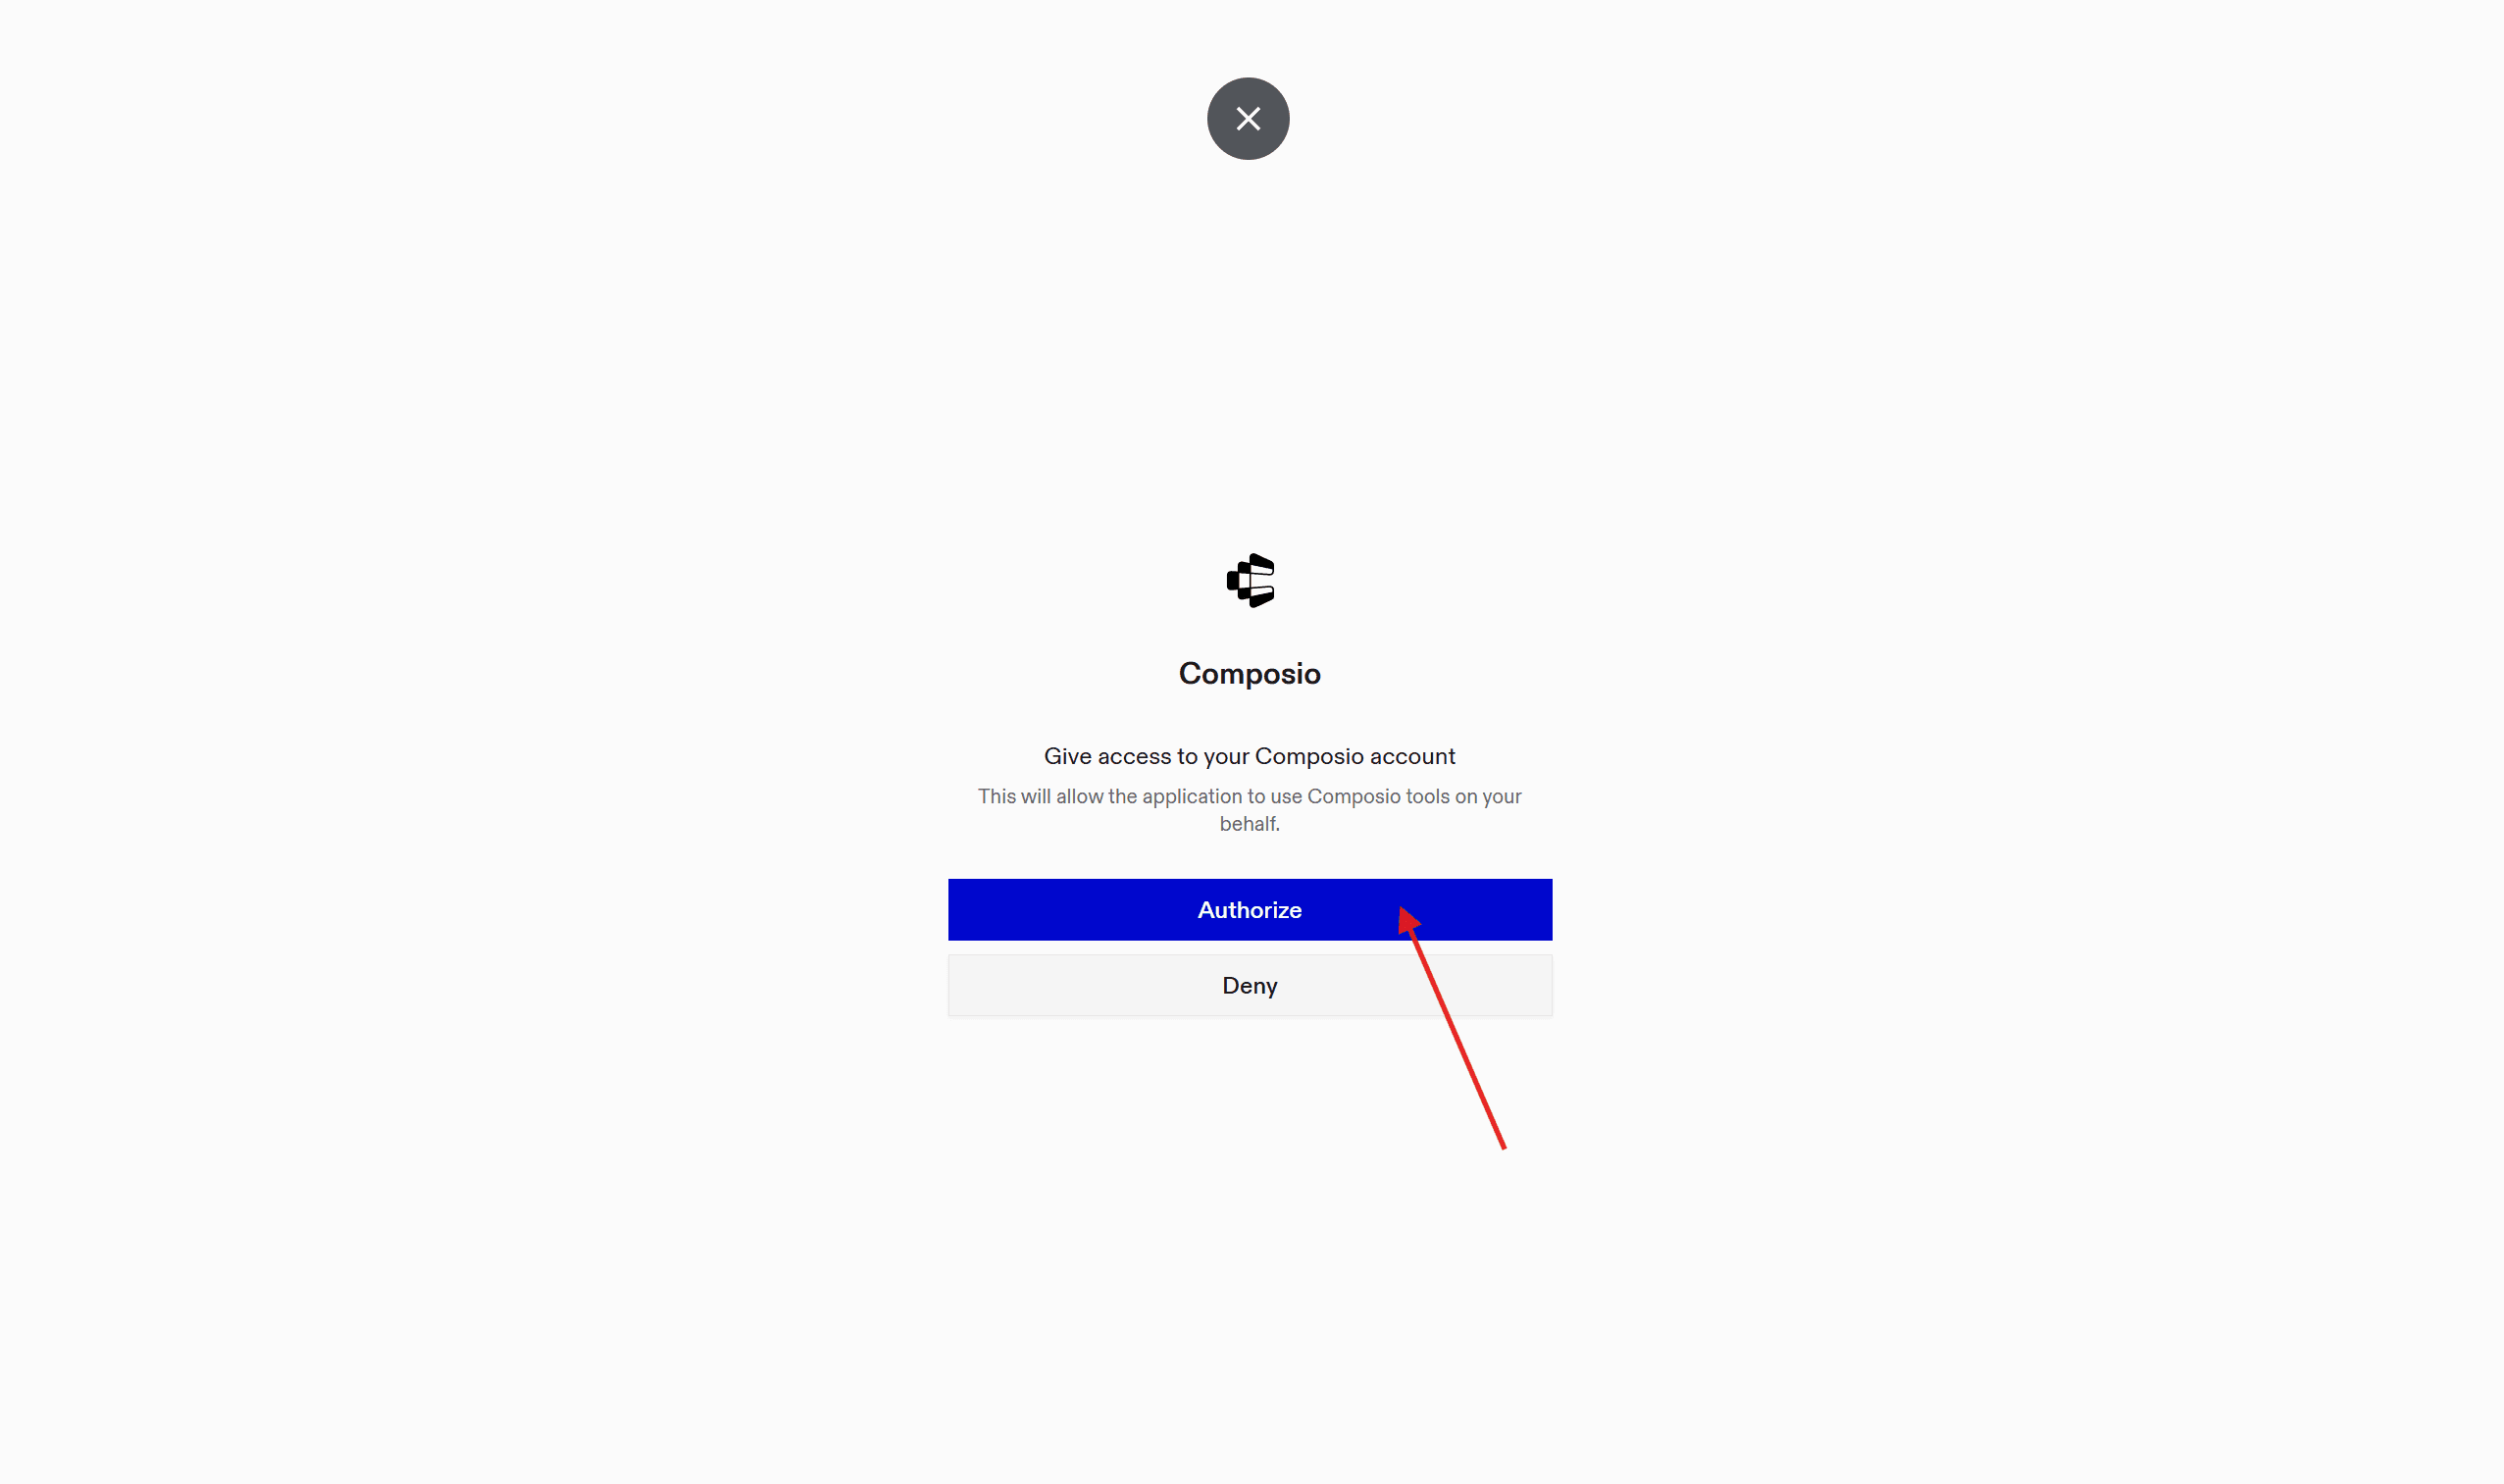
Once installed, click on Needs Authentication, then Authorize at redirect, and done!
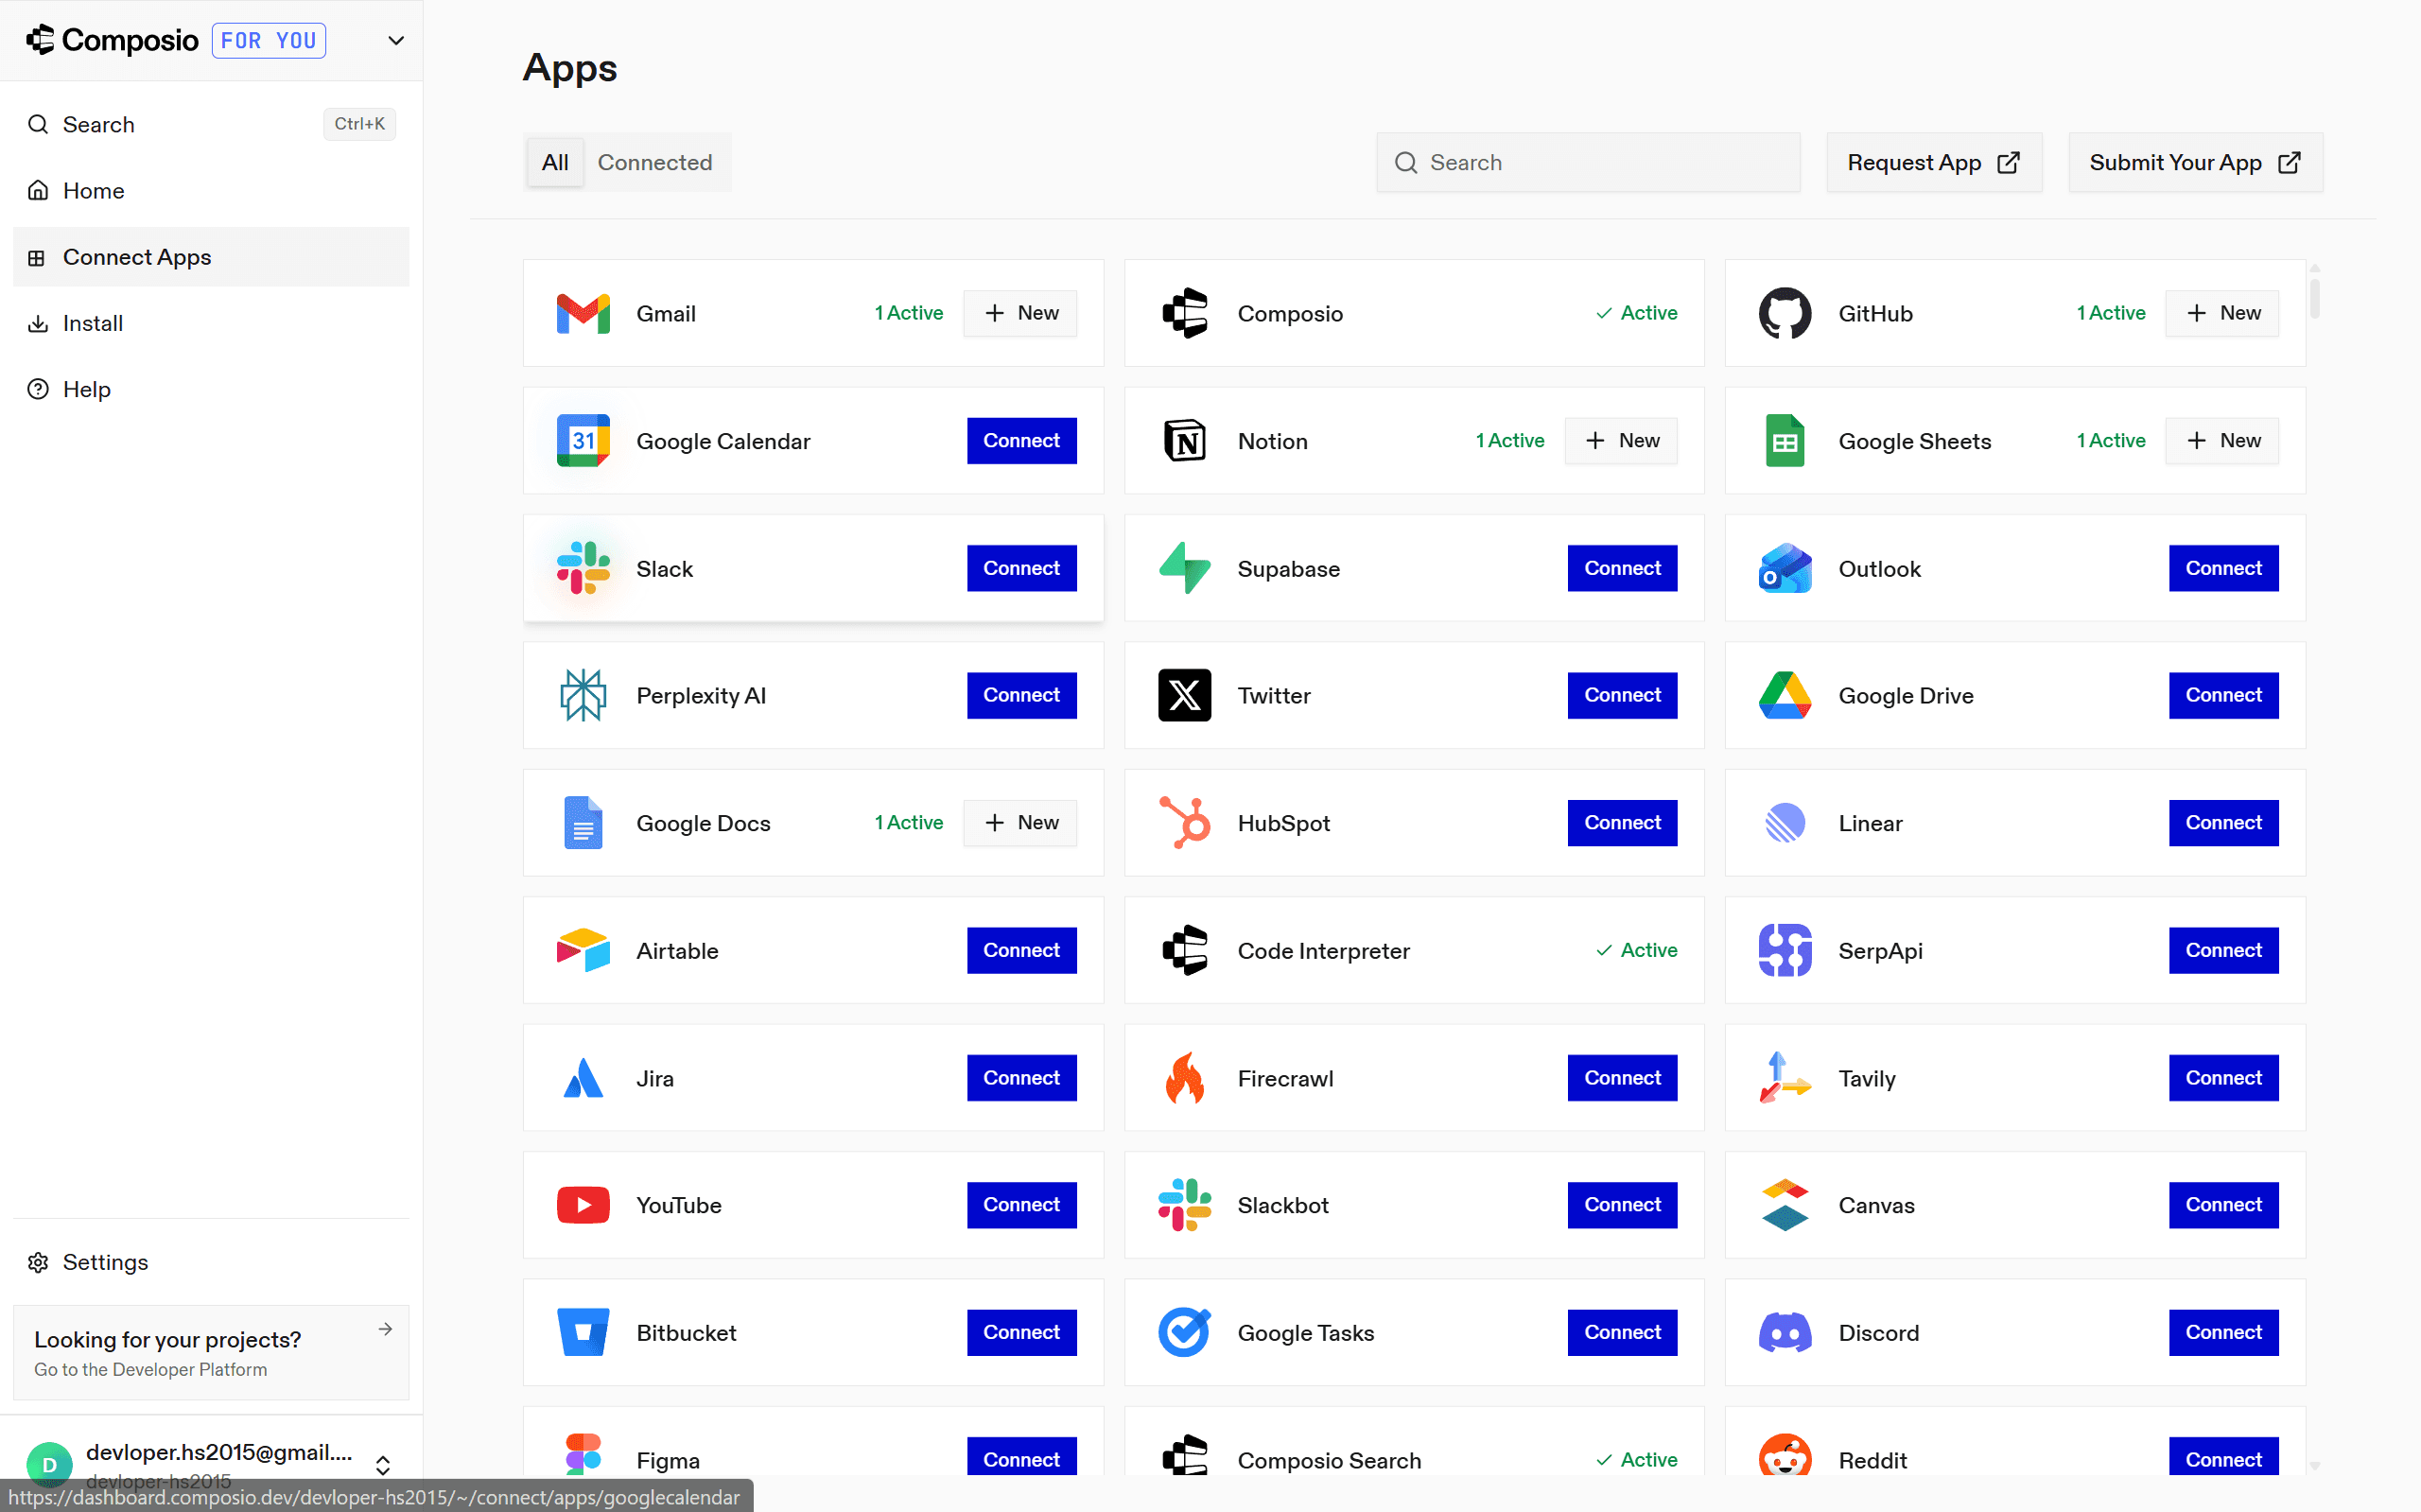
You can connect to apps in advance in the Connect Apps section; most of them use OAuth. (optional). If you don't, the agent will prompt you to connect at runtime.
To test the integration, open the Composer, establish a connection to the app, and ask it to perform actions.
But how did all this happen?
It turns out that if you go to your cursor MCP & Tools Page, select the ✏️ icon, and see the configuration as:
The **http **here means a streamable HTTP server. This allows the MCP server to operate as a normal web server (accessible via a URL) rather than as a local subprocess on your machine (for local MCP servers)
And interestingly, for any MCP to run in HTTP streamable mode, you have to replace:
to
And you are done, pretty handy, isn’t it?
Now, let's look at an advanced use case to see where Composio MCP helps.
Using MCP Servers for Advanced Use Case (Financial Agent)
Current financial institutions struggle with manual, time-intensive investment research that keeps analysts buried in data entry for weeks, delays critical decisions by days, lacks real-time risk visibility, creates compliance blind spots, and demands hiring more analysts just to manage portfolio volume - all while losing talent and clients
Let's see how the analyst can build financial agents and leverage Composio MCP to connect to 10-15 financial data sources (Yahoo Finance, SEC filings, Google Sheets, Bloomberg, etc.) and enrich their analysis by aggregating structured APIs, unstructured web scraping, and internal data warehouses.
The financial analyst agent will:
Aggregate financial data (Yahoo Finance, Google Sheets with company data, SEC filings via web scraping),
Run Claude analysis to generate investment thesis.
Create formatted reports in Google Docs,
Track portfolio changes (pull from Excel sheet),
and send Executive Summaries to stakeholders via email with embedded tables. (HTML format)
All done in parallel!
Web Scraping (composio & search api) + Google Sheets (composio) → Claude Analysis → Google Docs (composio) → Gmail (composio)
Prerequisites
Claude Code / Cursor / VS Code. I am going with Claude
Composio Account, login/signup
Assuming you have pre-requisites met, let's set up Composio on Claude.
Set up Composio MCP in Claude
To get started:
Visit the Composio MCP page. Ensure you are logged in, or else sign up
In the dashboard, head to the Install Section
Select Claude from the list, and click on Install.
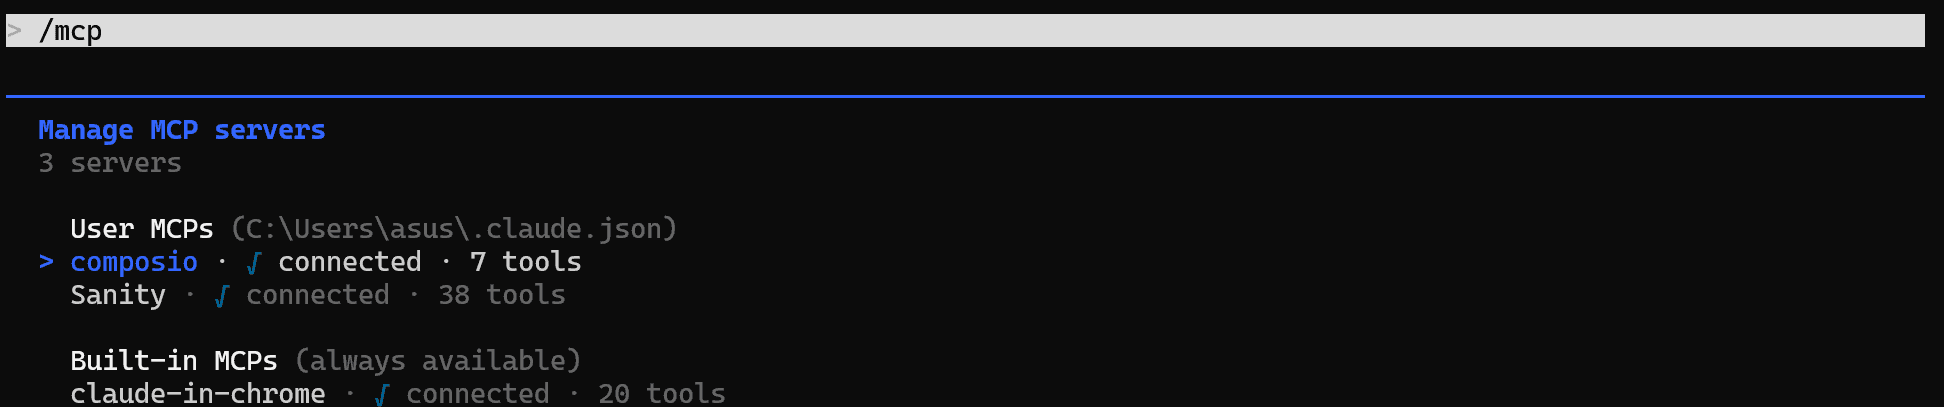
On the next page, select the MCP tab, then copy the command & paste it into the shell/terminal.
Ensure /mcp shows composio as an option. It might require authentication, so authenticate once
(Optional ) Once done, head to the Connect Apps page and click on Connect to connect Gmail, Google Drive, Google Sheets, and Google Docs. In case you ignore, agent will ask for these connections on runtime
Perfect, we only need to configure the document in the workspace
Set up Workspace for Agent
We will use Google Drive as our workspace to make the file accessible from everywhere:
Head to drive, create a new folder named
financial_data& from the URL, copy the folder ID.Inside, add an Excel file in the format & fill the data as:
Companies: List of all targeted companies with their analysis
Portfolio Performance: How the portfolio is performing over time, all metrics for targeted companies
Contact: List of all internal contacts: Portfolio Managers, Limited Partners, Investors, Board Managers, and more
Report Archive: Past report filing (sec)
Then add a Google Doc template for an investment report.
Make sure to copy the ID / URL of both files
Easiest way is to use the template given in the GitHub Repo and let any AI Agent turn them in the above given format. Then copy paste that in newly created google sheet & google doc file.
Now is the time to run the agent.
Run Financial Analyst Agent
To run the agent, open Claude Code and paste the financial_agent_prompt. You will be prompted to fill in the details with the copied values from earlier, and add your email address:
Once done, the agent handles the rest. Here is a demo of what it looks like, in production.
The agent also works on multiple portfolio reports. I am testing it with six different portfolios; you can adjust the count as needed.
Same setup, but with multiple portfolio data. Make sure to copy each one's ID, and use the financial_agent_prompt_for_multiple portfolio for the job.
Output
Note that, despite explicitly stating that Claude never created a subagent, this is because composio already has parallel execution enabled and, behind the scenes, uses subagents.
Hope this gave you an idea of how hosted MCP servers work, and tools like Composio MCP provide a universal tooling layer.
However, deploying a hosted MCP server for production is a different game. Let's look at a few rules to help ensure the servers don't break in real-world use.
Deployment Notes for Production MCP Servers
Though we didn't cover a hosted MCP server build, if you want to build your hosted MCP server (local + later deployed), follow the production checklist before you deploy & put an MCP server in front of real users:
Logging to stderr or files only, never stdout for stdio servers
Errors caught on every tool: return a clean error message, don't let exceptions kill the connection
Inputs validated: type hints (Python) or Zod (TypeScript) catch most issues; add explicit checks for things like SQL injection or path traversal if you're doing database/file operations
External API calls are rate-limited / Use Composio MCP: your tool runs whenever the LLM decides to call it, which can be a lot. Let Composio MCP handle it.
Secrets in environment variables, never hardcode in servers, never commit in production.
Tool descriptions for the LLM: Write specific, one-purpose per tool. Five small tools beat one giant tool. The approach we followed.
Schema versioning: when you change a tool's signature, bump your server's version so clients can adapt. Think API versioning.
Health check endpoint: for HTTP servers, expose
/healthfor your load balancer. Provides transparency to users.Auth on production HTTP servers: Use Bearer for internal, OAuth for public. But never both for the same for public/internal (private)
With this, we have come to the end of this comprehensive guide. Here is what matters the most.
Conclusion
As AI transforms software development, MCP will play an increasingly important role in creating seamless, integrated experiences.
Whether you're building custom MCP servers or leveraging pre-built solutions like Composio MCP, the protocol enables powerful enhancements to AI capabilities through external tools and data sources.
The full code for the Python versions is available on GitHub.
In case you need a few ideas, check out how to build an MCP client that talks to your server, or move up the stack and build an MCP-powered agent that orchestrates multiple servers at once. Happy building.
I hope you had a great learning experience - happy building with Composio! 🚀