Guide Overview
In this step-by-step guide, you will create an LLM-aided invoice manager that automatically retrieves invoice emails, processes them, and updates a Google Sheet. This project will utilize CrewAI, Gemini models, and Composio’s integrations with Gmail and Google Sheets. We will also use React + Vite and FastAPI to create a web app to communicate with the agent.
How does the Invoice Manager work?
So, this project simplifies retrieving invoice emails from Gmail, downloading invoice attachments, and extracting critical elements to a Google sheet.
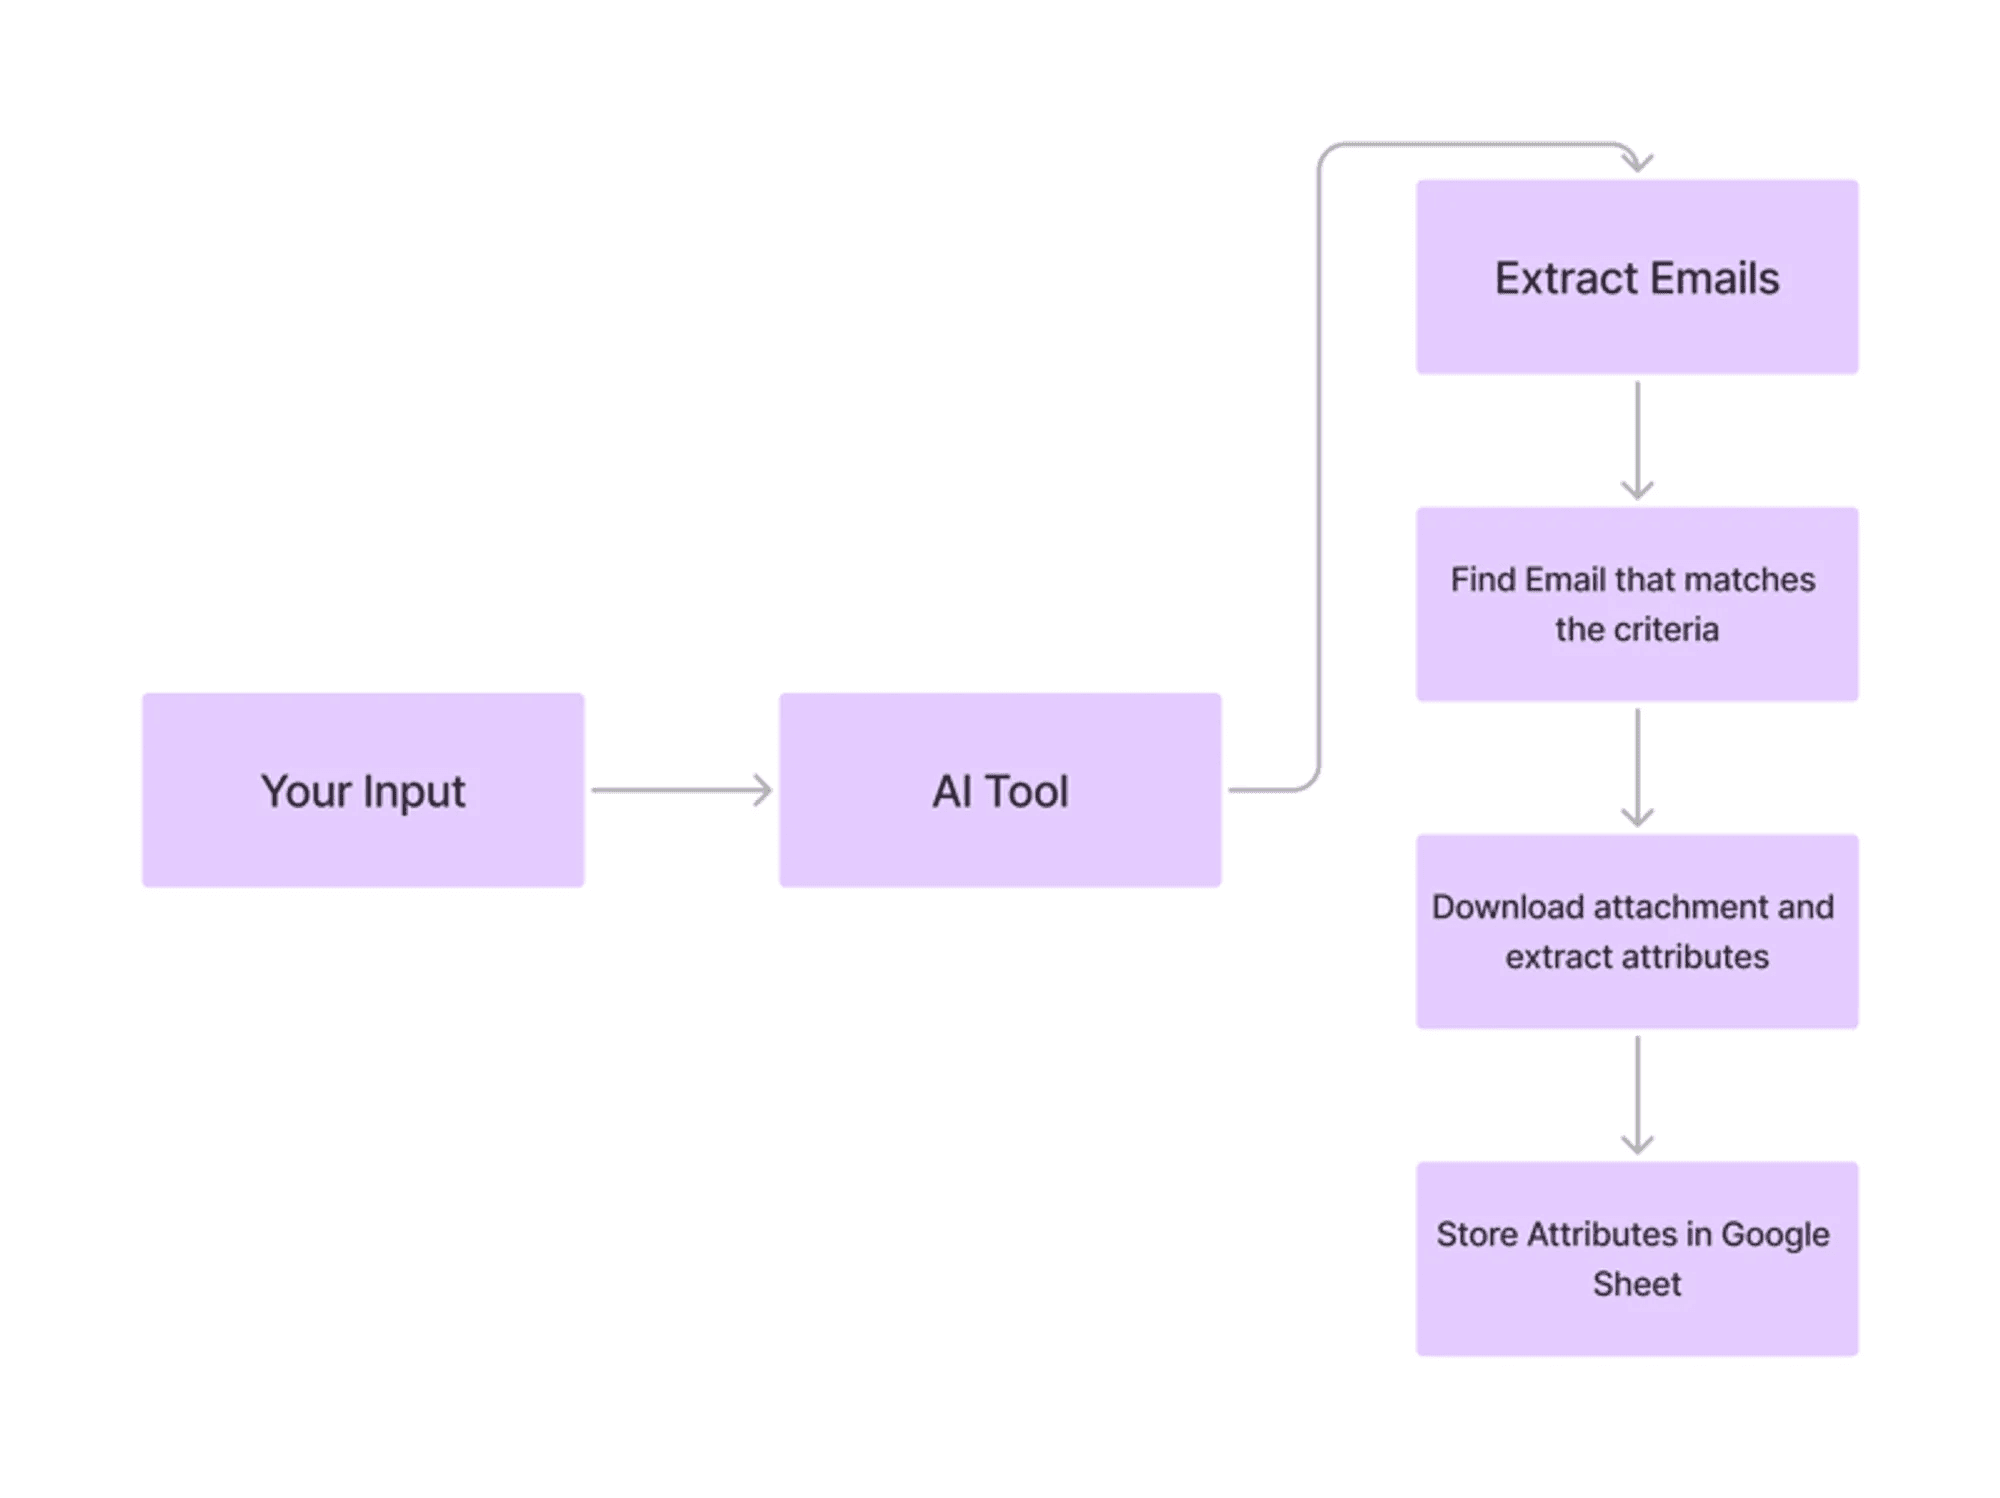
So, here’s a quick overview.
Begin by adding the keywords to search Invoice emails in the Gmail inbox, Sheet ID to update data, and Attributes to extract from invoices.
Then, Set up an event listener to poll emails from Gmail inbox.
Then, Fetch invoice emails and process the PDF attachments based on the criteria provided.
Finally, Extract and Update essential data points in a Google Sheet.
Technical Description of Invoice Manager
Under the hood, the Invoice manager workflow divides the task into multiple steps and executes them:
Retrieves emails from Gmail that match the keyword/phrase criteria.
Download the relevant attachments.
Extract valuable attributes from the attachments using Nanonets.
Stores the extracted data in the linked Google Sheet
Techstack
Frontend: React, Vite, and TailwindCSS.
Backend: Python, FastAPI.
AI Agent: CrewAI, Composio, Gemini.
Quick Description of AI Invoice Manager
Composio: Platform for integrating external applications with AI agents via tool calling.
CrewAI: An open-source framework for building multi-agent systems systems.
React + Vite: A combination of React for building UIs and Vite for fast development and build tooling.
FastAPI: Python framework for building REST APIs.
Gemini: A family of LLMs from Google.
Let’s Get Started
To start quickly, fork and clone this repository and cd into the gmail-assistant/gmail-assistant-simple folder.
The project has two parts: the back end and the front end. The back end consists of the Agentic system built using CrewAI, Composio, and Gemini, and the front end has an interactive UI.
Setting Up the Backend
To set up the development environment. Make the setup.sh executable and execute it.
cd GmailGenius/backend
chmod +x setup.sh
,/setup.sh
For reference, this is the setup.sh file.
#!/bin/bash
# Create a virtual environment
echo "Creating virtual environment..."
python3 -m venv ~/.venvs/gmail_agent
# Activate the virtual environment
echo "Activating virtual environment..."
source ~/.venvs/gmail_agent/bin/activate
# Install libraries from requirements.txt
echo "Installing libraries from requirements.txt..."
pip install -r requirements.txt
# Login to your account
echo "Login to your Composio acount"
composio login
# Add calendar tool
echo "Add Gmail tools. Finish the flow"
composio add gmail
composio add googlesheets
#Enable Gmail trigger
composio triggers enable gmail_new_gmail_message
# Copy env backup to .env file
if [ -f ".env.example" ]; then
    echo "Copying .env.example to .env..."
    cp .env.example .env
else
    echo "No .env.example file found. Creating a new .env file..."
    touch .env
fi
# Prompt user to fill the .env file
echo "Please fill in the .env file with the necessary environment variables."
echo "Setup completed successfully!"
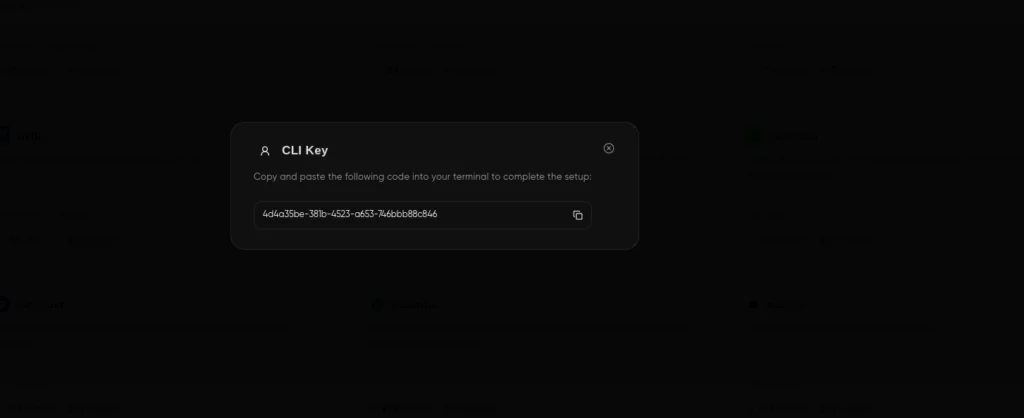
This will set up a Python virtual environment and install the necessary libraries from requirements.txt. You will then be prompted to log in to Composio, which will redirect you to the Composio login page.
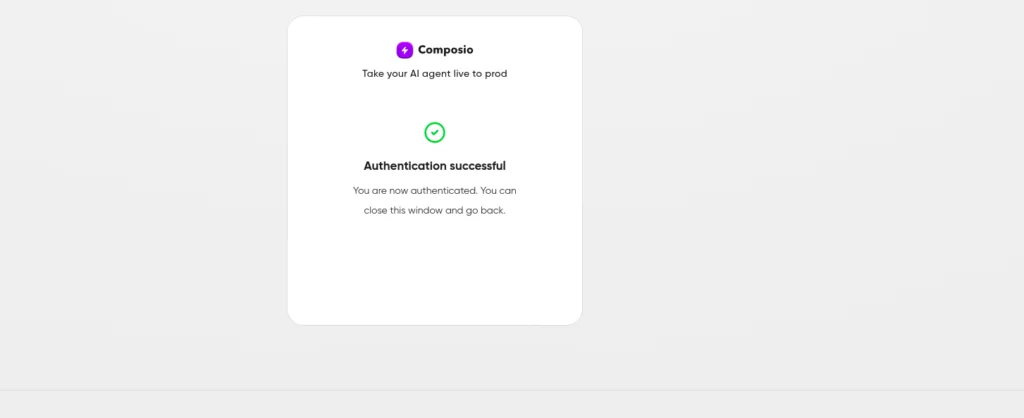
If you haven’t already, create an account on Composio and copy the provided key into the terminal to log in to your Composio account.
You will then be redirected to the Google Authentication page to add the Gmail and Google Sheet integrations.
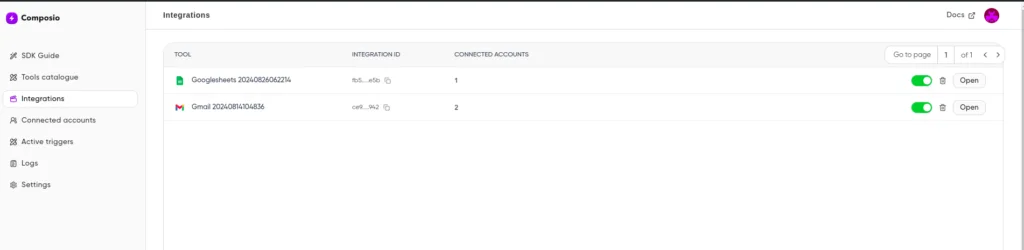
Once you complete integration, you can visit the composio dashboard and monitor your integrations.
Building the Invoice Manager App
Now that we are finished with the integrations let’s build the backend.
Prerequisites
Also, you will need API keys for Nanonets and Google’s Gemini to complete the project.
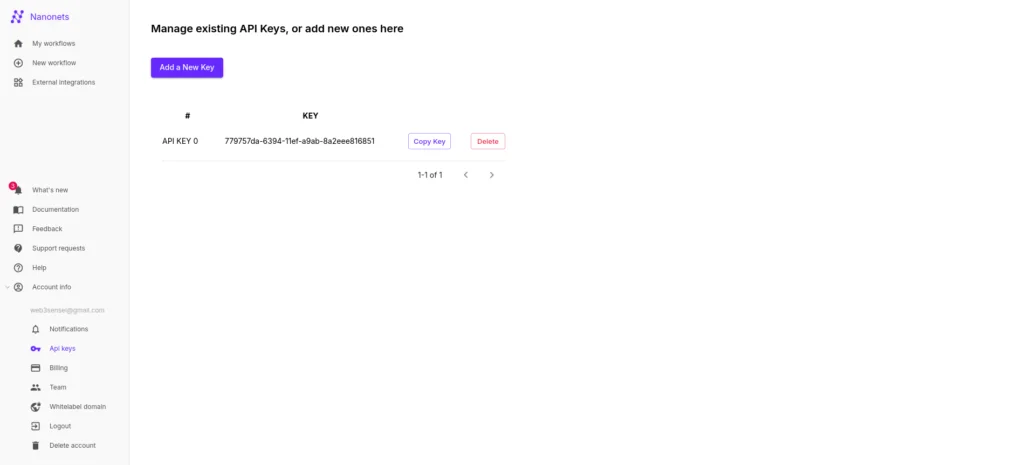
Nanonets API Key
This will help extract relevant data from the invoice PDFs. So, create an account with Nanonet and a free API key.
Also, set the Nanonet URL https://app.nanonets.com/api/v2/OCR/FullText into the .env file.
Gemini API Key
Also, go to the Google AI studio and create an API key.
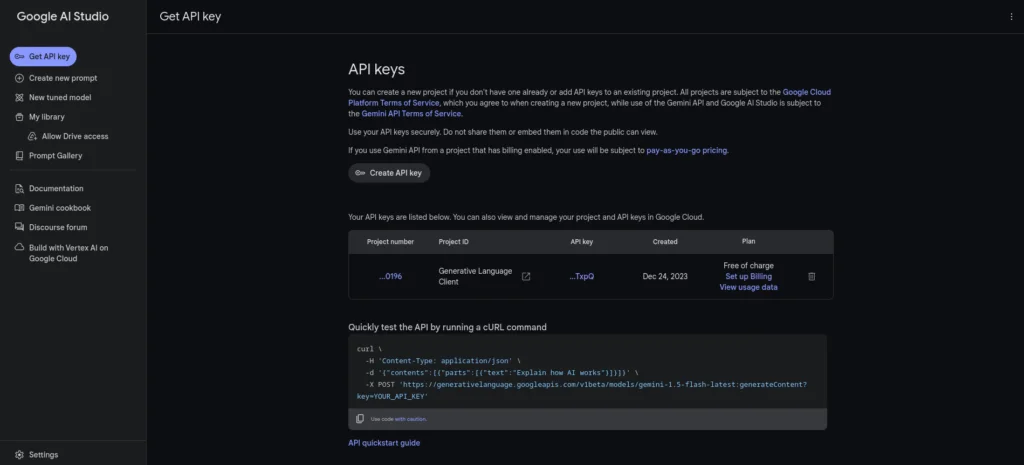
Save the keys to the .env file as well.
Building the AI Bot
In his section, you will create an AI bot to fetch invoices from your Gmail inbox, process the PDFs, and write the data to a Google Sheet.
Here’s a brief overview of this section:
Set up an event listener with a Gmail trigger to automatically retrieve emails from the inbox.
Then, develop an extraction tool using Nanonents for the AI bot to extract invoice attributes automatically.
Also, create a CrewAI agent to handle the extraction of attributes and update the Google Sheet.
Implement a few helper functions to assist in the process.
Begin with Importing the required modules and load environment variables inside the agent.py file.
import os
import re
import glob
import json
from composio.client.collections import TriggerEventData
from composio_crewai import Action, ComposioToolSet
from crewai import Agent, Crew, Task, Process
from crewai_tools.tools.base_tool import BaseTool
from langchain_openai import ChatOpenAI
from dotenv import load_dotenv
from typing import Any, Dict
import requests
load_dotenv()
Next, Create an instance for Gemini.
from langchain_google_genai import ChatGoogleGenerativeAI
llm = ChatGoogleGenerativeAI(model="gemini-1.5-flash",
                             verbose=True, temperature=0.5,
                             google_api_key=os.environ.get("GEMINI_API_KEY"))
Defining Increment Counter Tool
We will also want a tool to keep track of inserted rows in Google Sheets.
#Get the current counter value
def read_counter():
    try:
        with open("counter.json", "r") as file:
            data = json.load(file)
            return data["counter"]
    except FileNotFoundError:
        initial_data = {"counter": 0}
        with open("counter.json", "w") as file:
            json.dump(initial_data, file)
        return 0
#Tool to increment counter value
class incrementCounter(BaseTool):
    name: str = "Increment Counter"
    description: str = "This tool increments the counter value"
    def _run(self):
        current_value = read_counter()
        new_value = current_value + 1
        data = {"counter": new_value}
        with open("counter.json", "w") as file:
            json.dump(data, file)
It keeps track of the row position in Google Sheets to ensure data is added accurately. Because we need to specify the exact cell (e.g., A1) for each entry, the counter determines the next available row, even if some rows are already filled. The counter only updates when data is successfully added, maintaining the correct position and avoiding unnecessary updates when no new data is entered.
Defining Extractor tool + Google tools
Define a tool to extract the emails using Nanonets.
str: pdf_files = glob.glob(os.path.join("/Users/abhishekpatil/.composio/output/", "*.pdf")) #modify path as per need if not pdf_files: return None most_recent_pdf = max(pdf_files, key=os.path.getctime) return most_recent_pdf #Extract useful attributes from the attachment class extractorTool(BaseTool): name: str = "ExtractorTool" description: str = "This tool extracts useful attributes from pdf document/attachments" def _run(self) -> Dict[str, Any]: attachment = get_recent_attachment() url = os.environ.get("NANO_URL") FilePath = {'file': open(attachment, 'rb')} response = requests.post(url, auth=requests.auth.HTTPBasicAuth(os.environ.get("NANO_API_KEY"), ''), files=FilePath) return json.loads(response.text)["result"][0]["prediction"] " style="color:#d8dee9ff;display:none" aria-label="Copy">
#Get the attachment that was recently downloaded
def get_recent_attachment() -> str:
    pdf_files = glob.glob(os.path.join("/Users/abhishekpatil/.composio/output/", "*.pdf")) #modify path as per need
    if not pdf_files:
        return None
    most_recent_pdf = max(pdf_files, key=os.path.getctime)
    return most_recent_pdf
#Extract useful attributes from the attachment
class extractorTool(BaseTool):
    name: str = "ExtractorTool"
    description: str = "This tool extracts useful attributes from pdf document/attachments"
    def _run(self) -> Dict[str, Any]:
        attachment = get_recent_attachment()
        url = os.environ.get("NANO_URL")
        FilePath = {'file': open(attachment, 'rb')}
        response = requests.post(url, auth=requests.auth.HTTPBasicAuth(os.environ.get("NANO_API_KEY"), ''), files=FilePath)
        return json.loads(response.text)["result"][0]["prediction"]
In the above code block,
We define a custom CrewAI tool
extractor toolto parse PDFs and extract information.The
get_recent_attachment()function retrieves the recently downloaded PDF.
Then, Initialise the Composio tools for Gmails, Google Sheets, and the extractor tool we just defined.
#Tools
IncrementCounter = incrementCounter()
Extractor_tool=extractorTool()
composio_toolset = ComposioToolSet()
google_tools = composio_toolset.get_actions(
    actions=[
        # Action.GMAIL_FETCH_MESSAGE_BY_THREAD_ID,
        Action.GMAIL_GET_ATTACHMENT,
        Action.GMAIL_FETCH_EMAILS,
        Action.GOOGLESHEETS_BATCH_UPDATE
    ]
)
tools = google_tools + [Extractor_tool, IncrementCounter]
We defined an Extractor Tool before and now the Google tool with three actions:
Action.GMAIL_GET_ATTACHMENT: Retrieves attachments from Gmail emails.
Action.GMAIL_FETCH_EMAILS: Fetches emails from Gmail based on specific criteria.
Action.GOOGLESHEETS_BATCH_UPDATE: Updates data in Google Sheets.
Defining CrewAI Agent
Then, define a CrewAI agent.
google_assistant = Agent(
    role="Gmail Assistant",
    goal="""Get five recent emails/messages and check if the thread ID matches, download attachments & extract attributes/information from it & store attributes in Google sheet (Store just the values & not the attribute names)""",
    backstory=f"""You're an AI assistant that makes use of google tools/APIs and does work on behalf of user. You can extract attributes/information from attachments & Store them in Google sheet""",
    verbose=True,
    llm=llm,
    tools=tools,
    allow_delegation=False,
)
The agent is responsible for carrying out the tasks.
Create an instance of Agent with
Role, Goal and Backstory: This provides the LLM additional context to complete a job.
Verbose: Log execution traces on the terminal.
LLM: The OpenAI instance.
Tools: All the tools we defined earlier, such as the Extractor and Google tools.
allow delegation: Set to false so that the agent will not pass control flow to other agents (if available)
Event Listener
Next, set up the event listener.
The listener continuously monitors the Gmail inbox and retrieves emails as they arrive. You can also configure the event listener with specific trigger filters.
During the Composio setup, we enabled a Gmail trigger that pulls new emails from the inbox.
The Event listener is paired with a callback function executed whenever the trigger detects an event.
#Get keywords, attributes & sheet ID
def readData():
    with open("taskData.json", "r") as file:
        data = json.load(file)
        return [data["keywords"], data["attributes"], data["sheetId"]]
def formatData(payload):
    try:
        threadId = payload.get("threadId", "NA")
        attachmentDetails = payload.get("attachmentList", [])
        if not attachmentDetails or not isinstance(attachmentDetails, list):
            return [threadId, "NA", "NA"]
        attachmentId = attachmentDetails[0].get("attachmentId", "NA")
        filename = attachmentDetails[0].get("filename", "NA")
        return [threadId, attachmentId, filename]
    except (IndexError, AttributeError, TypeError) as e:
        # Log the error if needed
        return ["NA", "NA", "NA"]
@listener.callback(filters={"trigger_name": "GMAIL_NEW_GMAIL_MESSAGE"})
def callback_new_message(event: TriggerEventData) -> None:
    print("Received email")
    payload = event.payload
    formattedPayload = formatData(payload)
    message_id = formattedPayload[0]
    attachment_id = formattedPayload[1]
    file_name = formattedPayload[2]
    res = readData()
    keywords = res[0]
    attributes = res[1]
    sheetId = res[2]
    find_invoice_from_gmail = Task(
        description=f"""
        Check if the email subject or body contains keywords like {keywords}, if so then download the attachment & store the following attributes: {attributes} in google sheet with id {sheetId} & sheet name sheet1 and cell A{read_counter()},
        Email: {payload}
        """,
        agent=google_assistant,
        expected_output="If email matches criteria ({keywords}) then download attachment & store attributes on google sheet & increment counter if and only if email matches keywords, otherwise indicate email isn't related",
    )
    gmail_processing_crew = Crew(
        agents=[google_assistant],
        tasks=[find_invoice_from_gmail],
        verbose=1,
        process=Process.sequential,
    )
    result = gmail_processing_crew.kickoff()
    return result
print("Subscription created!")
listener.listen()
In the callback function callback_new_message:
We start by formatting the event payload from Gmail and extracting relevant data like message ID, thread ID, and more.
Then retrieve the keywords for identifying invoices in emails, the attributes to save in the Google Sheet, and the sheet name from the JSON file saved from the front end.
Then, we defined a CrewAI Task for the
google_assistantagent, providing a clear description and specifying the expected output.Lastly, we configure the Crew with the defined agent and task and set up the event listener.
Running the Event Listener
Finally, run the event listener using the following command.
python agent.py
This will set up the event listener, polling the Gmail inbox regularly (the default is 10 minutes).
When a new email is received, it will look for relevant keywords that you specified on the front end and trigger the Crew if an appropriate match is found.
The Agent will analyse the emails, process the invoices, and then update the Google Sheets with relevant invoice attributes.
Building the API backend
Next, we will build an API endpoint to receive information from the front end. As I mentioned before, we will use FastAPI and Pydantic.
Import the required modules and set up logging.
from fastapi import FastAPI, HTTPException
from fastapi.middleware.cors import CORSMiddleware
from pydantic import BaseModel
from agent import run_crew
import logging
# Set up logging
logging.basicConfig(level=logging.INFO)
logger = logging.getLogger(__name__)
Create a FastAPI app and set up CORS using. CORSMiddleware.
app = FastAPI()
app.add_middleware(
    CORSMiddleware,
    allow_origins=["*"],
    allow_credentials=True,
    allow_methods=["*"],
    allow_headers=["*"],
)
allow_origins=["*"]: Allows requests from any origin. This is useful for development but should be restricted in production.allow_credentials=True: Allows cookies and HTTP authentication to be included in the requests.allow_methods=["*"]: Allows all HTTP methods (GET, POST, PUT, DELETE, etc.).allow_headers=["*"]: Allows all headers in the requests.
Now, define a Pydantic class for Message.
class Message(BaseModel):
    emailKeywords: str
    attributes: str
    sheetId: str
Also, a write data function to save information to a JSON file.
def writeData(keywords: str, attributes: str, sheetId: str):
    data = {
        "keywords": keywords,
        "attributes": attributes,
        "sheetId": sheetId
    }
    with open("taskData.json", "w") as file:
        json.dump(data, file, indent=4)
Finally, define the POST endpoint.
@app.post("/configparameters")
async def handle_request(message: Message):
    try:
        logger.info(f"Received request with emailKeywords: {message.emailKeywords} and attributes: {message.attributes}")
        writeData(message.emailKeywords, message.attributes, message.sheetId)
        logger.info(f"Data written successfully to taskData.json")
        return {"message": "Data written successfully"}
    except Exception as e:
        logger.error(f"Error occurred: {str(e)}")
        raise HTTPException(status_code=500, detail=str(e))
The endpoint receives user inputs from the front end and saves them to a JSON file.
Building the Frontend
The application's front end is built with React and Vite.
Go to the src directory and install the dependencies.
npm install
Create Pages for the Invoice Manager App
For this project, we have three pages.
Home: The Home page lists FAQs, etc.
Dashboard: The main app user interface.
Designing the Home page
Let’s now design the Home page.
The home page will contain a few FAQs and information regarding this project.
import Hero from "../components/Hero";
import Benefits from "../components/Benefits";
import FAQ from "../components/FAQ";
import Working from "../components/Working";
import ActionButton from "../components/ActionButton";
const Home = () => {
    return <section className="bg-white dark:bg-gray-900 mt-12">
        <div className="py-8 px-4 mx-auto max-w-screen-xl text-center lg:py-16 lg:px-12">
            <Hero />
            <Benefits />
            <Working />
            <FAQ />
            <div className="mt-20">
                <ActionButton displayName={"Get started"} link={"#"} />
            </div>
        </div>
    </section>
}
export default Home;
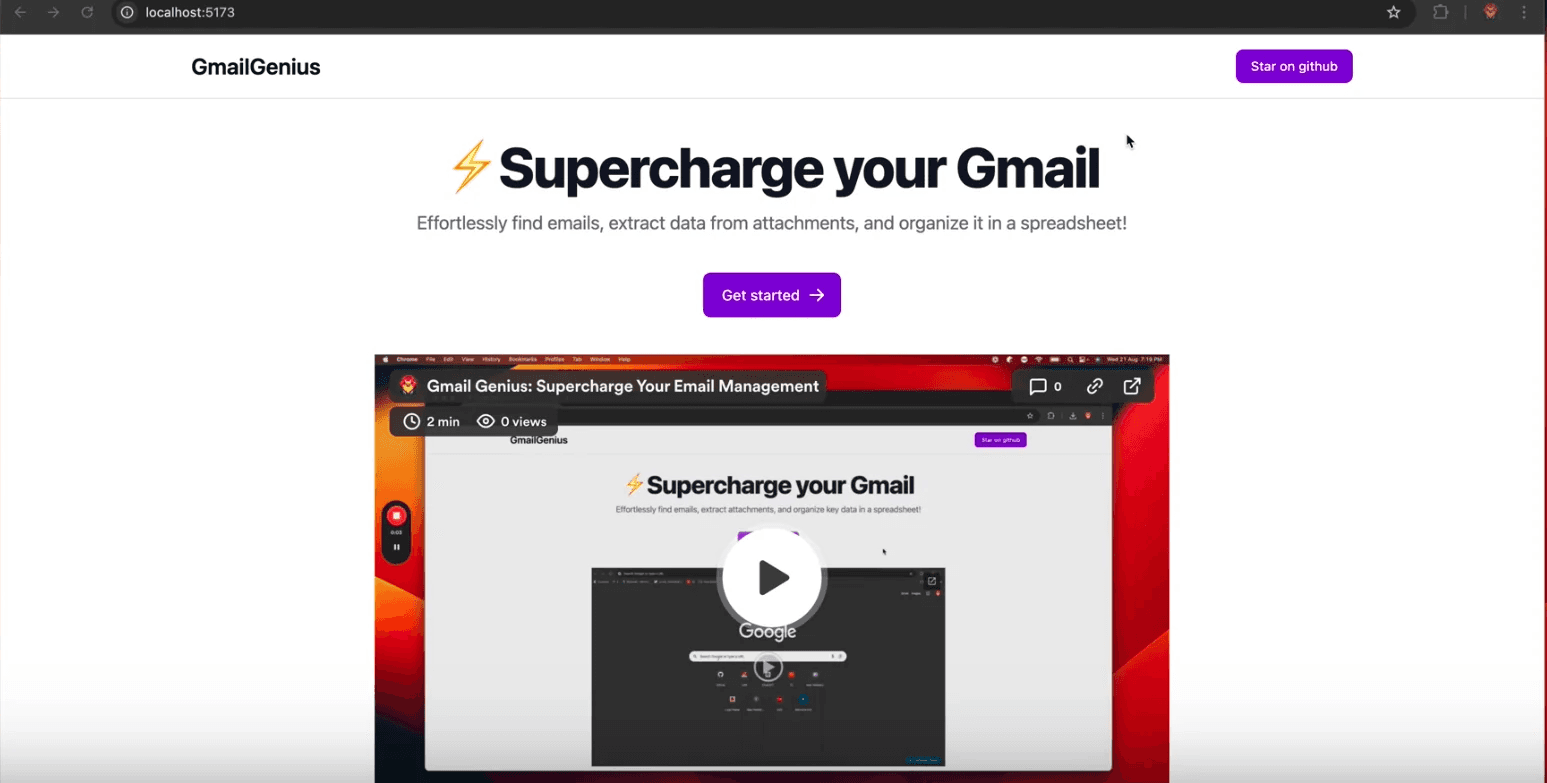
This will create a simple Home page like the following picture.
Designing the Dashboard
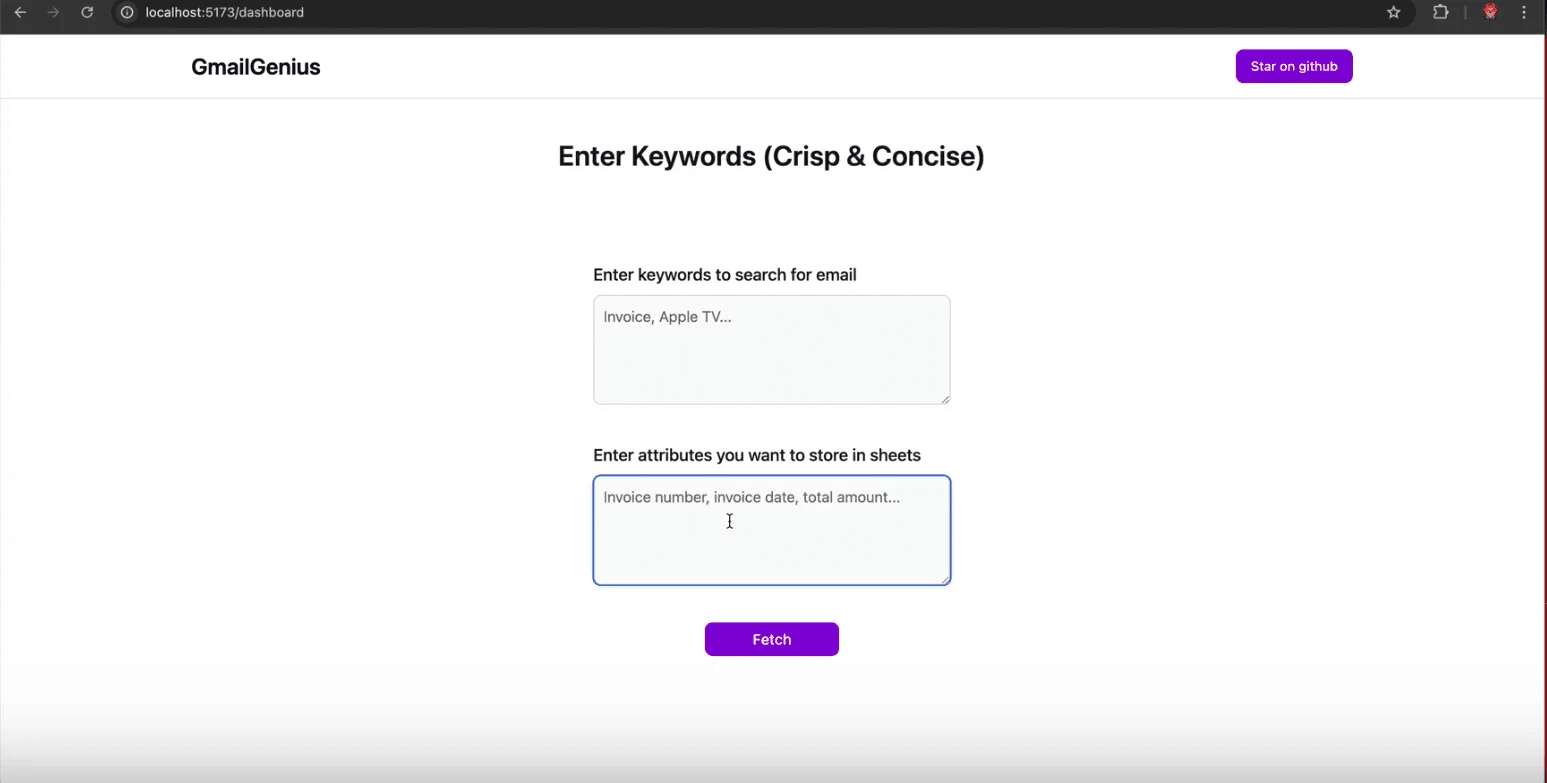
The dashboard contains two input text boxes that accept keywords that will be used to search emails and attributes you want to store in the spreadsheet.
import ConfigParameters from "../components/ConfigParameters";
const Dashboard = () => {
    return <section className="bg-white dark:bg-gray-900 mt-12">
        <div className="py-8 px-4 mx-auto max-w-screen-xl text-center lg:py-16 lg:px-12">
            <span className="font-semibold text-3xl text-gray-900">Enter Keywords (Crisp & Concise)</span>
            <ConfigParameters />
        </div>
    </section>
}
export default Dashboard;
This will create a nice, simple dashboard for accepting user information. The fetch button will trigger the backend to spring into action.
Defining the Main App layout
In the App.jsx file, we set up the primary component that manages user authentication and controls access to specific routes.
import { BrowserRouter, Routes, Route } from "react-router-dom";
import Navbar from "./components/Navbar";
import Home from "./pages/Home";
import Footer from "./components/Footer";
import Dashboard from "./pages/Dashboard";
import ScrollToTop from "./components/ScrollToTop";
const App = () => {
  return <>
    <BrowserRouter>
      <Navbar />
      <ScrollToTop />
      <Routes>
        <Route path="/dashboard" element={<Dashboard />} />
        <Route path="/" element={<Home />}>
        </Route>
      </Routes>
      <Footer />
    </BrowserRouter>
  </>
}
export default App;
This is what is happening in the above function.
Imports: The code imports Home, Dashboard, Footer components, etc.
Router Setup: The dashboard component is rendered when the URL path is “/dashboard” and the home component when the path is “/home”. The nav bar and footers are rendered throughout the app.
Define the Entrypoint
Finally, define the main.jsx file as the entry point for the application.
, )" style="color:#d8dee9ff;display:none" aria-label="Copy">
import { StrictMode } from 'react'
import { createRoot } from 'react-dom/client'
import App from './App.jsx'
import './index.css'
createRoot(document.getElementById('root')).render(
  <StrictMode>
    <App />
  </StrictMode>,
)
This gets executed when the application is run.
Running the App
Finally, run the application using the following npm command.
npm run dev
This will start up the front-end server on the localhost:5345.
You can now visit the Invoice Manager app and input the necessary details; when you click the configure button, the details will be saved to a JSON file.
See the entire workflow in action below.

Next Steps
In this article, you successfully built a comprehensive AI Invoice Manager that manages invoices from Gmail, processes them precisely, and seamlessly updates the data in a Google Sheet, streamlining your workflow and reducing manual effort.
With Composio’s extensive range of integrations, you have the flexibility to build and automate virtually anything. Moreover, the Composio Cookbook offers even more fascinating real-world examples of agentic automation, so be sure to explore it.